

今回は、React + TypeScriptのアプリケーションにredux-toolkitとreact-hook-formを導入して、実際に利用してみようと思います!
Reactなどフロントエンド開発において、State管理というのはすごく面倒なプロセスの1つなので、少しでも簡単に管理していきたいと思っている方がいれば、ぜひ参考にしてみてくだい!
まだ、React TypeScriptの開発環境を未構築の方は、「ReactとTypeScriptとRedux Toolkitの開発環境構築をしよう!」を参考にしてみてください!

本記事はReact・TypeScript・Redux Toolkitの利用を前提に実装をしていきます。
構築からデプロイまでやっていきますので、必要に応じて他の記事も参考にしてみてください。
学習に使った本はこちら!
 クマじい
クマじいAmazon Kindle Unlimited でもReactの本はいっぱいあるぞ!
事前準備をしよう!

まずはredux-toolkitを使っていくにあたり、必要なことをやっておきましょう!
環境構築をする。
本ブログを見てくれている中には、過去記事も見てくれている方もいると思います。
もし環境構築ができていない方は、「ReactとTypeScriptとRedux Toolkitの開発環境構築をしよう!」を参考にしてみてください!
この記事では、「npx create-react-app piita-client –template redux-typescript」というコマンドで、アプリケーションの雛形を作成しており、redux-toolkitがデフォルトで導入されるようになっております。
もし上記で雛形を作成しない場合は、個別でredux-toolkitの導入をするようにしてください。
フォームを作成しておく。
今回は、このようなフォームに対応するredux-toolkitの実装をしていきます。
もちろん必須ではないですが、フォームを作っておくことでよりわかりやすくなると思います。
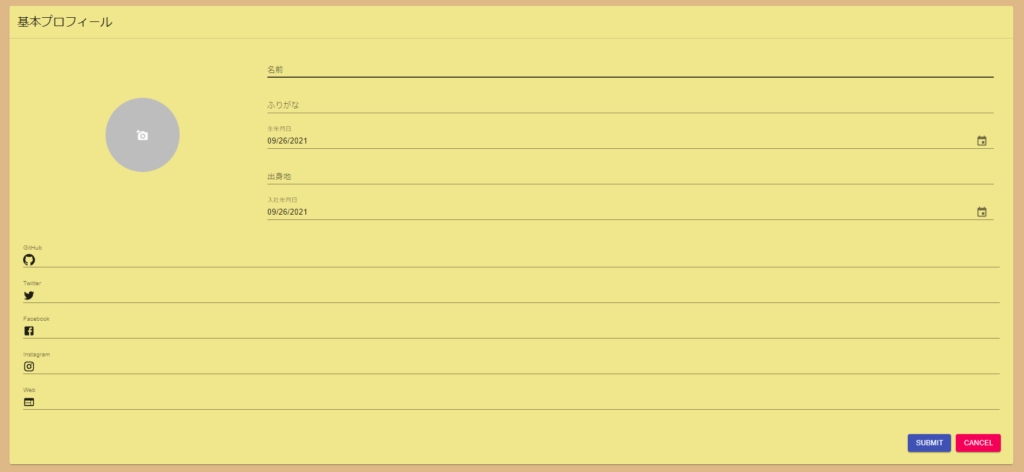
フォームの作り方に関しては、「Formのレイアウトを作成する!」で詳細に説明しているので参考にしてみてください。
とりあえず、今回のフォーム相当のコードはこちらに記載しておきます。
あまり綺麗なコードではないのですが、一応コピペで同様のフォームが作れると思います。
ProfileFormCard.tsx
import React from "react";
// material-ui
import {
  Button,
  Grid,
  Box,
  Card,
  CardHeader,
  CardContent,
  Tooltip,
  IconButton,
  Avatar,
  TextField,
  InputAdornment,
  Divider,
} from "@material-ui/core";
import {
  GitHub as GitHubIcon,
  Twitter as TwitterIcon,
  Facebook as FacebootIcon,
  Instagram as InstagramIcon,
  Web as WebIcon,
  AddAPhoto as AddAPhotoIcon,
} from "@material-ui/icons";
// date-io
import DateFnsUtils from "@date-io/date-fns";
import {
  MuiPickersUtilsProvider,
  KeyboardDatePicker,
} from "@material-ui/pickers";
// style
import styles from "./ProfileFormCard.module.scss";

const ProfileFormCard = (): JSX.Element => {
  return (
    <div className={styles.root}>
      <form className={styles.form}>
        <Card className={styles.card}>
          <CardHeader title="基本プロフィール" className={styles.card_header} />
          <Divider />
          <CardContent className={styles.card_content}>
            <Grid
              container
              justifyContent="center"
              alignItems="center"
              spacing={3}
            >
              <Grid container spacing={3} item xs={3}>
                <Grid item xs={12}>
                  <div className={styles.upload_button}>
                    <Tooltip title="add">
                      <IconButton className={styles.icon_button}>
                        <Avatar className={styles.avatar}>
                          <AddAPhotoIcon />
                        </Avatar>
                      </IconButton>
                    </Tooltip>
                  </div>
                </Grid>
              </Grid>
              <Grid container spacing={3} item xs={9}>
                <Grid item xs={12}>
                  <TextField
                    margin="normal"
                    id="name"
                    label="名前"
                    fullWidth
                    className={styles.text_field}
                  />
                  <TextField
                    margin="normal"
                    id="kana"
                    label="ふりがな"
                    fullWidth
                    className={styles.text_field}
                  />
                  <MuiPickersUtilsProvider utils={DateFnsUtils}>
                    <KeyboardDatePicker
                      margin="normal"
                      id="birthday"
                      label="生年月日"
                      format="MM/dd/yyyy"
                      value={new Date("2014-08-18T21:11:54")}
                      onChange={(data) => null}
                      fullWidth
                    />
                  </MuiPickersUtilsProvider>
                  <TextField
                    margin="normal"
                    id="birthplace"
                    label="出身地"
                    fullWidth
                    className={styles.text_field}
                  />
                  <MuiPickersUtilsProvider utils={DateFnsUtils}>
                    <KeyboardDatePicker
                      margin="normal"
                      id="joinCompanyDate"
                      label="入社年月日"
                      format="MM/dd/yyyy"
                      value={new Date("2014-08-18T21:11:54")}
                      onChange={(data) => null}
                      fullWidth
                    />
                  </MuiPickersUtilsProvider>
                </Grid>
              </Grid>
              <Grid container spacing={3} item xs={12}>
                <Grid item xs={12}>
                  <TextField
                    margin="normal"
                    id="github"
                    label="GitHub"
                    fullWidth
                    className={styles.text_field}
                    InputProps={{
                      startAdornment: (
                        <InputAdornment position="start">
                          <GitHubIcon />
                        </InputAdornment>
                      ),
                    }}
                  />
                  <TextField
                    margin="normal"
                    id="twitter"
                    label="Twitter"
                    fullWidth
                    className={styles.text_field}
                    InputProps={{
                      startAdornment: (
                        <InputAdornment position="start">
                          <TwitterIcon />
                        </InputAdornment>
                      ),
                    }}
                  />
                  <TextField
                    margin="normal"
                    id="facebook"
                    label="Facebook"
                    fullWidth
                    className={styles.text_field}
                    InputProps={{
                      startAdornment: (
                        <InputAdornment position="start">
                          <FacebootIcon />
                        </InputAdornment>
                      ),
                    }}
                  />
                  <TextField
                    margin="normal"
                    id="instagram"
                    label="Instagram"
                    fullWidth
                    className={styles.text_field}
                    InputProps={{
                      startAdornment: (
                        <InputAdornment position="start">
                          <InstagramIcon />
                        </InputAdornment>
                      ),
                    }}
                  />
                  <TextField
                    margin="normal"
                    id="web"
                    label="Web"
                    fullWidth
                    className={styles.text_field}
                    InputProps={{
                      startAdornment: (
                        <InputAdornment position="start">
                          <WebIcon />
                        </InputAdornment>
                      ),
                    }}
                  />
                </Grid>
              </Grid>
            </Grid>
          </CardContent>
          <Box component="span" m={2} className={styles.button_wrapper}>
            <Button
              type="submit"
              variant="contained"
              color="primary"
              className={styles.submit_button}
            >
              SUBMIT
            </Button>
            <Button
              type="button"
              variant="contained"
              color="secondary"
              onClick={() => null}
              className={styles.cancel_button}
            >
              CANCEL
            </Button>
          </Box>
        </Card>
      </form>
    </div>
  );
};
export default ProfileFormCard;
ProfileFormCard.module.scss
.root {
  .form {
    .card {
      background-color: khaki;
      .card_content {
        .upload_button {
          display: flex;
          justify-content: center;
          align-items: center;
          .icon_button {
            .avatar {
              width: 150px;
              height: 150px;
            }
          }
        }
      }
    }
  }
  .button_wrapper {
    display: flex;
    justify-content: flex-end;
    align-items: flex-end;
    margin: 20px;
    .submit_button,
    .cancel_button {
      margin: 5px;
    }
  }
}
 クマじい
クマじい事前準備はこんな感じじゃな!
redux-toolkitを利用していこう!
事前準備ができたら、実際にredux-toolkitの使い方を説明していきます。
実際にredux-toolkitを使う前に、簡単に手順の概要を説明しておきます!
詳しい内容は、それぞれを作成する中で説明していきます!
redux-toolkitの章で実装していくのは、STEP2のsliceの作成までです。
実際に、redux-toolkitで作成したものを使うのは、react-hook-formの利用で説明していきます!
State(状態)の管理を行うコンポーネントを実装します。
Stateの初期値やデータ型を定義したり、Stateを更新するためのコンポーネントを実装します。
reduxで言うところの、actionやreducer相当のものがsliceと認識してもらえればいいと思います。
最後に、Step2で作成したsliceを利用してReactコンポーネントから呼び出して、Stateを更新します。
storeを作成する。
ではSTEP1のstoreの作成をやっていきましょう!
とはいえ、「npx create-react-app piita-client –template redux-typescript」で構築している場合、store.tsはデフォルトで作成されていると思いますので、それに少し手を加えていきましょう!
- src>app>store.tsを開く
- デフォルトの場合、counterが含まれていますのでそれを削除してください。
(デフォルトのカウンターアプリの実装が残っているだけなので、消して大丈夫です。) - 今後、sliceを作成する度にreducerに追加していく。
現時点でやることは、これだけです。
下記の状態になっていれば大丈夫です!
import { configureStore, ThunkAction, Action } from "@reduxjs/toolkit";

export const store = configureStore({
  reducer: {},
});

export type AppDispatch = typeof store.dispatch;
export type RootState = ReturnType<typeof store.getState>;

export type AppThunk<ReturnType = void> = ThunkAction<
  ReturnType,
  RootState,
  unknown,
  Action<string>
>;
ここからはおまけなのですが、実際はstoreを使えるようにしているコードも雛形作成時に自動生成されています。
一応理解しておくために、コードを見ておきましょう!
- src>index.tsxを開く
- <Provider store={store}>が該当箇所です。
ProviderでAppをラップすることで、App配下のコンポーネントでstoreで管理されているstateにアクセスすることができています。
import React from "react";
import ReactDOM from "react-dom";
import "./index.css";
import App from "./App";
import { store } from "./app/store";
import { Provider } from "react-redux";
import * as serviceWorker from "./serviceWorker";

ReactDOM.render(
  <React.StrictMode>
    <Provider store={store}>
      <App />
    </Provider>
  </React.StrictMode>,
  document.getElementById("root")
);

serviceWorker.unregister();
sliceを作成する。
STEP2のsliceの作成をやっていきましょう。redux-toolkitで一番大切なSTEPです!
まずは、src>feature>profile>profileSlice.tsを作成しておきましょう。
作成したら、下記のように実装の概要をコメントとして残しておきます。(これはお好みで!!)
// 必要なコンポーネントをインポート

// Null許可タイプ

// Stateの型を定義する

// Stateの初期値を定義する

// Sliceを定義する

// actionsをエクスポートする
// reducerをエクスポートする
// selectorをエクスポートする
必要なコンポーネントをインポート
早速実装していきましょう!
まずは、必要なコンポーネントをインポートしていきます。
// 必要なコンポーネントをインポート
import { createAsyncThunk, createSlice, PayloadAction } from "@reduxjs/toolkit";
import { RootState, AppThunk } from "../../app/store";

// Null許可タイプを定義する

// Stateの型を定義する

// Stateの初期値を定義する

// Sliceを定義する

// actionsをエクスポートする
// reducerをエクスポートする
// selectorをエクスポートする
それぞれの説明は、下記になります。
- redux-toolkit
-
- createAsyncThunk
- 非同期処理用でaxiosなどを利用する(今回は利用しない。)
- createSlice
- state,actionとreducerを一緒に管理する
- payloadAction
- redux-toolkitで生成されたアクションは、payloadAction<T>型を使って定義する。action.payloadフィールドの型を一般的な引数として受け取る。
- createAsyncThunk
- store
-
- RootState
- storeからstateを取得する
- AppThunk
- 同期処理と非同期処理を混在させて処理する(今回は利用しない。)
- RootState
Null許可タイプを定義する。
Nullが入る可能性があるデータ型があれば、予めNull許可用のタイプを作成しておきましょう。
Null許可がある毎に、[ | null]と書くのは見栄えもよろしくないですね。
import { createAsyncThunk, createSlice, PayloadAction } from "@reduxjs/toolkit";
import { RootState, AppThunk } from "../../app/store";

// Null許可タイプを定義する
type Nullable<T> = T | null;

// Stateの型を定義する

// Stateの初期値を定義する

// Sliceを定義する

// actionsをエクスポートする
// reducerをエクスポートする
// selectorをエクスポートする
Stateの型を定義する。
続いて、Stateのデータ型を定義しておきます。
今回利用するフォームに対応するデータ型を定義しております。
必要に応じて、先ほど定義しておいたNull許可でラップしておきましょう。
import { createAsyncThunk, createSlice, PayloadAction } from "@reduxjs/toolkit";
import { RootState, AppThunk } from "../../app/store";

// Null許可タイプを定義する
type Nullable<T> = T | null;

// Stateの型を定義する
export interface ProfileState {
  memberId: number;
  profile: Nullable<{
    image: Nullable<File>;
    name: string;
    kana: string;
    birthday: Date;
    birthplace: string;
    joinCompanyDate: Date;
    githubUrl: Nullable<string>;
    twitterUrl: Nullable<string>;
    facebookUrl: Nullable<string>;
    instagramUrl: Nullable<string>;
    webUrl: Nullable<string>;
  }>;
}

// Stateの初期値を定義する

// Sliceを定義する

// actionsをエクスポートする
// reducerをエクスポートする
// selectorをエクスポートする
Stateの初期値を定義する。
Stateの初期値を定義します。
memberIdは、今後の対応とするので一旦「1」を固定で入れています。
profileは、初期状態ではNullとしておきましょう。
import { createAsyncThunk, createSlice, PayloadAction } from "@reduxjs/toolkit";
import { RootState, AppThunk } from "../../app/store";

// Null許可タイプを定義する
type Nullable<T> = T | null;

// Stateの型を定義する
export interface ProfileState {
  memberId: number;
  profile: Nullable<{
    image: Nullable<File>;
    name: string;
    kana: string;
    birthday: Date;
    birthplace: string;
    joinCompanyDate: Date;
    githubUrl: Nullable<string>;
    twitterUrl: Nullable<string>;
    facebookUrl: Nullable<string>;
    instagramUrl: Nullable<string>;
    webUrl: Nullable<string>;
  }>;
}

// Stateの初期値を定義する
const initialState: ProfileState = {
  memberId: 1,
  profile: null,
};

// Sliceを定義する

// actionsをエクスポートする
// reducerをエクスポートする
// selectorをエクスポートする
Sliceを定義する。
では、本題ですね。Sliceを定義していきましょう。
import { createAsyncThunk, createSlice, PayloadAction } from "@reduxjs/toolkit";
import { RootState, AppThunk } from "../../app/store";

// Null許可タイプを定義する
type Nullable<T> = T | null;

// Stateの型を定義する
export interface ProfileState {
  memberId: number;
  profile: Nullable<{
    image: Nullable<File>;
    name: string;
    kana: string;
    birthday: Date;
    birthplace: string;
    joinCompanyDate: Date;
    githubUrl: Nullable<string>;
    twitterUrl: Nullable<string>;
    facebookUrl: Nullable<string>;
    instagramUrl: Nullable<string>;
    webUrl: Nullable<string>;
  }>;
}

// Stateの初期値を定義する
const initialState: ProfileState = {
  memberId: 1,
  profile: null,
};

// Sliceを定義する
export const profileSlice = createSlice({
  // name: action typeに使われる名称
  // 初期値
  // reducersの定義
  name: "profile",
  initialState,
  reducers: {
    // profileの更新
    updateProfile: (state, action: PayloadAction<ProfileState["profile"]>) => {
      // stateをaction.payloadに入れ替え
      state.profile = action.payload;
    },
  },
});

// actionsをエクスポートする
// reducerをエクスポートする
// selectorをエクスポートする
actions,selector,reducerをエクスポートする。
最後にSliceからactions,reducer,selectorをエクスポートしましょう!
これでSliceの実装が完了です!
import { createAsyncThunk, createSlice, PayloadAction } from "@reduxjs/toolkit";
import { RootState, AppThunk } from "../../app/store";

// Null許可タイプを定義する
type Nullable<T> = T | null;

// Stateの型を定義する
export interface ProfileState {
  memberId: number;
  profile: Nullable<{
    image: Nullable<File>;
    name: string;
    kana: string;
    birthday: Date;
    birthplace: string;
    joinCompanyDate: Date;
    githubUrl: Nullable<string>;
    twitterUrl: Nullable<string>;
    facebookUrl: Nullable<string>;
    instagramUrl: Nullable<string>;
    webUrl: Nullable<string>;
  }>;
}

// Stateの初期値を定義する
const initialState: ProfileState = {
  memberId: 1,
  profile: null,
};

// Sliceを定義する
export const profileSlice = createSlice({
  // name: action typeに使われる名称
  // 初期値
  // reducersの定義
  name: "profile",
  initialState,
  reducers: {
    // profileの更新
    updateProfile: (state, action: PayloadAction<ProfileState["profile"]>) => {
      // stateをaction.payloadに入れ替え
      state.profile = action.payload;
    },
  },
});

// actionsをエクスポート
export const { updateProfile } = profileSlice.actions;
// reducerをエクスポート
export default profileSlice.reducer;
// selectorをエクスポート
export const selectProfile = (state: RootState): ProfileState["profile"] =>
  state.profile.profile;
store.tsにsliceを追加する。
sliceの実装が完了したら、storeに追加しましょう。
ここでインポートするのは、先ほどの「export default profileSlice.reducer;」の部分です。
インポートしたものを、configureStore>reducerに「profile: profileReducer」として追加しておきましょう!
import { configureStore, ThunkAction, Action } from "@reduxjs/toolkit";
// reducer
import profileReducer from "../features/profile/profileSlice";

export const store = configureStore({
  reducer: {
    profile: profileReducer,
  },
});

export type AppDispatch = typeof store.dispatch;
export type RootState = ReturnType<typeof store.getState>;
export type AppThunk<ReturnType = void> = ThunkAction<
  ReturnType,
  RootState,
  unknown,
  Action<string>
>;
クマじい
クマじいこれで一旦、redux-toolkitの使い方は終わりじゃな。。。
react-hook-formを利用していこう!
ここまでできたら、react-hook-formを利用して、先ほど作成したものを呼び出す処理を実装していきましょう!
そもそもreact-hook-formが何かわからない人もいると思いますので、その辺を簡単に説明しておきます。
- react-hook-formとは何か?
-
公式の言葉を借りると、「高性能で柔軟かつ拡張可能な使いやすいフォームバリデーションライブラリ」となります。
もう少し簡単に言うと、フォームの実装が簡単になるライブラリです。
フォームの入力内容の管理やバリデーションチェックなどを行ってくれるライブラリと考えておきましょう。
ここまでできたら、実際に作業をするにあたりどのようなSTEPがあるか確かめておきましょう!
State(状態)の管理を行うコンポーネントを実装します。
Stateの初期値やデータ型を定義したり、Stateを更新するためのコンポーネントを実装します。
reduxで言うところの、actionやreducer相当のものがsliceと認識してもらえればいいと思います。
最後に、Step2で作成したsliceを利用してReactコンポーネントから呼び出して、Stateを更新します。
react-hook-formをインストールする。
まずは、npm(yarn)を使って、react-hook-formをインストールしておきましょう。
npm install react-hook-formreact-hook-formを利用するために、フォームを修正
インストールできたら、react-hook-formを利用するために、ProfileFormCard.tsxを修正していきます。
フォームのコードは、本記事の事前準備でコードを記載していますが念の為、改めて記載しておきます。
import部分は長いので、省略しているので必要がある方は、事前準備で確認してください。
このタイミングで必要な実装をコメットで記載しておきます。(これはお好みで!)
・・・import省略・・・
// 必要なコンポーネントをインポートする

// 必要なAPIをコンポーネントから取得する
// 更新用の関数を定義する
// 各入力フォームの要素の参照を登録する
const ProfileFormCard = (): JSX.Element => {
  return (
    <div className={styles.root}>
      <form className={styles.form}>
        <Card className={styles.card}>
          <CardHeader title="基本プロフィール" className={styles.card_header} />
          <Divider />
          <CardContent className={styles.card_content}>
            <Grid
              container
              justifyContent="center"
              alignItems="center"
              spacing={3}
            >
              <Grid container spacing={3} item xs={3}>
                <Grid item xs={12}>
                  <div className={styles.upload_button}>
                    <Tooltip title="add">
                      <IconButton className={styles.icon_button}>
                        <Avatar className={styles.avatar}>
                          <AddAPhotoIcon />
                        </Avatar>
                      </IconButton>
                    </Tooltip>
                  </div>
                </Grid>
              </Grid>
              <Grid container spacing={3} item xs={9}>
                <Grid item xs={12}>
                  <TextField
                    margin="normal"
                    id="name"
                    label="名前"
                    fullWidth
                    className={styles.text_field}
                  />
                  <TextField
                    margin="normal"
                    id="kana"
                    label="ふりがな"
                    fullWidth
                    className={styles.text_field}
                  />
                  <MuiPickersUtilsProvider utils={DateFnsUtils}>
                    <KeyboardDatePicker
                      margin="normal"
                      id="birthday"
                      label="生年月日"
                      format="MM/dd/yyyy"
                      value={new Date("2014-08-18T21:11:54")}
                      onChange={(data) => null}
                      fullWidth
                    />
                  </MuiPickersUtilsProvider>
                  <TextField
                    margin="normal"
                    id="birthplace"
                    label="出身地"
                    fullWidth
                    className={styles.text_field}
                  />
                  <MuiPickersUtilsProvider utils={DateFnsUtils}>
                    <KeyboardDatePicker
                      margin="normal"
                      id="joinCompanyDate"
                      label="入社年月日"
                      format="MM/dd/yyyy"
                      value={new Date("2014-08-18T21:11:54")}
                      onChange={(data) => null}
                      fullWidth
                    />
                  </MuiPickersUtilsProvider>
                </Grid>
              </Grid>
              <Grid container spacing={3} item xs={12}>
                <Grid item xs={12}>
                  <TextField
                    margin="normal"
                    id="github"
                    label="GitHub"
                    fullWidth
                    className={styles.text_field}
                    InputProps={{
                      startAdornment: (
                        <InputAdornment position="start">
                          <GitHubIcon />
                        </InputAdornment>
                      ),
                    }}
                  />
                  <TextField
                    margin="normal"
                    id="twitter"
                    label="Twitter"
                    fullWidth
                    className={styles.text_field}
                    InputProps={{
                      startAdornment: (
                        <InputAdornment position="start">
                          <TwitterIcon />
                        </InputAdornment>
                      ),
                    }}
                  />
                  <TextField
                    margin="normal"
                    id="facebook"
                    label="Facebook"
                    fullWidth
                    className={styles.text_field}
                    InputProps={{
                      startAdornment: (
                        <InputAdornment position="start">
                          <FacebootIcon />
                        </InputAdornment>
                      ),
                    }}
                  />
                  <TextField
                    margin="normal"
                    id="instagram"
                    label="Instagram"
                    fullWidth
                    className={styles.text_field}
                    InputProps={{
                      startAdornment: (
                        <InputAdornment position="start">
                          <InstagramIcon />
                        </InputAdornment>
                      ),
                    }}
                  />
                  <TextField
                    margin="normal"
                    id="web"
                    label="Web"
                    fullWidth
                    className={styles.text_field}
                    InputProps={{
                      startAdornment: (
                        <InputAdornment position="start">
                          <WebIcon />
                        </InputAdornment>
                      ),
                    }}
                  />
                </Grid>
              </Grid>
            </Grid>
          </CardContent>
          <Box component="span" m={2} className={styles.button_wrapper}>
            <Button
              type="submit"
              variant="contained"
              color="primary"
              className={styles.submit_button}
            >
              SUBMIT
            </Button>
            <Button
              type="button"
              variant="contained"
              color="secondary"
              onClick={() => null}
              className={styles.cancel_button}
            >
              CANCEL
            </Button>
          </Box>
        </Card>
      </form>
    </div>
  );
};
export default ProfileFormCard;
必要なコンポーネントをインポートする。
まずは、必要なコンポーネントをインポートしていきましょう。
・・・import省略・・・
// 必要なコンポーネントをインポートする
// react-hook-form
import { Controller, useForm } from "react-hook-form";
// hooks
import { useAppDispatch } from "../../../../app/hooks";
// components
import {
  updateProfile,
  ProfileState,
} from "../../../../features/profile/profileSlice";

// 更新用の関数を定義する
// 各入力フォームの要素の参照を登録する
・・・以下、省略・・・
それぞれの説明は、下記になります。
- react-hook-form
-
- useForm
- react-hook-formは、このコンポーネントが提供するAPIを利用して実装していきます。
詳細は、実際に使うタイミングで紹介します。
- react-hook-formは、このコンポーネントが提供するAPIを利用して実装していきます。
- Controller
- Material UIなどの外部の制御されたUIコンポーネントと組み合わせる際に、useFormのAPIだけでは難しいことがあります。
その際に、ラップして利用するコンポーネントです。
今回は、詳しくは説明しませんが、こう使うよと言うレベルで紹介できればいいかなと思っています。
- Material UIなどの外部の制御されたUIコンポーネントと組み合わせる際に、useFormのAPIだけでは難しいことがあります。
- useForm
- hook
-
- useAppDispatch
- stateを更新するためには、dispatchを通してreducerを呼び出す必要があります。
そのために必要なコンポーネントになります。
- stateを更新するためには、dispatchを通してreducerを呼び出す必要があります。
- useAppDispatch
- profileSlice
-
- updateProfile
- これは先ほどredux-toolkitで作成したstateを更新するためのreducer関数です。
- ProfileState
- これも先ほどredux-toolkitで作成したstateのデータ型です。
- updateProfile
必要なAPIをコンポーネントから取得する
先ほどインポートしたコンポーネントから必要なAPIを取得しておきましょう。
・・・import省略・・・
// 必要なコンポーネントをインポートする
// react-hook-form
import { Controller, useForm } from "react-hook-form";
// hooks
import { useAppDispatch } from "../../../../app/hooks";
// components
import {
  updateProfile,
  ProfileState,
} from "../../../../features/profile/profileSlice";

// 更新用の関数を定義する
// 各入力フォームの要素の参照を登録する
const ProfileFormCard = (): JSX.Element => {

  // 必要なAPIをコンポーネントから取得する
  const dispatch = useAppDispatch();
  const { register, handleSubmit, control, reset } = useForm();

  ・・・以下、省略・・・
};
export default ProfileFormCard;
dispatchは先ほどの説明と同様なので、useFormのAPIについて少し説明をしておきます。
- useForm
-
- register
- input/selectのRefとバリデーションルールをreact-hook-formに登録する。
- handleSubmit
- フォームバリデーションに成功した場合に、フォームデータを渡す。
- reset
- フォームをリセットする。
- control
- Controllerコンポーネントを利用する際に使うAPIで、react-hook-formに制御されたコンポーネントを登録する。
- register
更新用の関数を定義する。
続いては、フォームデータを利用してDispatchする関数を実装しましょう。
handleUpdateは、Submitボタンが押下されるとhandleSumit()を介してバリデーションチェックを行い、handleSubmit()からフォームデータを受け取り、updateProfileをdispatchします。
・・・import省略・・・
// 必要なコンポーネントをインポートする
// react-hook-form
import { Controller, useForm } from "react-hook-form";
// hooks
import { useAppDispatch } from "../../../../app/hooks";
// components
import {
  updateProfile,
  ProfileState,
} from "../../../../features/profile/profileSlice";


// 各入力フォームの要素の参照を登録する
const ProfileFormCard = (): JSX.Element => {

  // 必要なAPIをコンポーネントから取得する
  const dispatch = useAppDispatch();
  const { register, handleSubmit, control, reset } = useForm();

  // 更新用の関数を定義する
  const handleUpdate = (data: ProfileState) => {
    dispatch(updateProfile(data.profile));
    reset();
  };

  return (
    <div className={styles.root}>
      <form onSubmit={handleSubmit(handleUpdate)} className={styles.form}>
        ・・・以下、省略・・・
      </form>
    </div>
  );
};
export default ProfileFormCard;
各入力フォームの要素の参照を登録する。
最後は、各入力フォームの要素の参照を登録していきます。
今回のフォームにはTextFieldとKeyboardDatePickerがあります。
TextFieldはregisterを使って、KeyboardDatePickerはControllerを使ってラップしてあげます。
最終的なコードは、下記のようになっていると思います。
・・・import省略・・・
// 必要なコンポーネントをインポートする
// react-hook-form
import { Controller, useForm } from "react-hook-form";
// hooks
import { useAppDispatch } from "../../../../app/hooks";
// components
import {
  updateProfile,
  ProfileState,
} from "../../../../features/profile/profileSlice";


// 各入力フォームの要素の参照を登録する
const ProfileFormCard = (): JSX.Element => {

  // 必要なAPIをコンポーネントから取得する
  const dispatch = useAppDispatch();
  const { register, handleSubmit, control, reset } = useForm();

  // 更新用の関数を定義する
  const handleUpdate = (data: ProfileState) => {
    dispatch(updateProfile(data.profile));
    reset();
  };

  return (
    <div className={styles.root}>
      <form onSubmit={handleSubmit(handleUpdate)} className={styles.form}>
        <Card className={styles.card}>
          <CardHeader title="基本プロフィール" className={styles.card_header} />
          <Divider />
          <CardContent className={styles.card_content}>
            <Grid
              container
              justifyContent="center"
              alignItems="center"
              spacing={3}
            >
              <Grid container spacing={3} item xs={3}>
                <Grid item xs={12}>
                  <div className={styles.upload_button}>
                    <Tooltip title="add">
                      <IconButton className={styles.icon_button}>
                        <Avatar className={styles.avatar}>
                          <AddAPhotoIcon />
                        </Avatar>
                      </IconButton>
                    </Tooltip>
                  </div>
                </Grid>
              </Grid>
              <Grid container spacing={3} item xs={9}>
                <Grid item xs={12}>
                  <TextField
                    margin="normal"
                    id="name"
                    label="名前"
                    fullWidth
                    {...register("profile.name")}
                    className={styles.text_field}
                  />
                  <TextField
                    margin="normal"
                    id="kana"
                    label="ふりがな"
                    fullWidth
                    {...register("profile.kana")}
                    className={styles.text_field}
                  />
                  <MuiPickersUtilsProvider utils={DateFnsUtils}>
                    <Controller
                      control={control}
                      name="profile.birthday"
                      render={({ field }) => {
                        return (
                          <KeyboardDatePicker
                            margin="normal"
                            id="birthday"
                            label="生年月日"
                            format="MM/dd/yyyy"
                            value={field.value}
                            onChange={(data) => field.onChange(data)}
                            fullWidth
                          />
                        );
                      }}
                    />
                  </MuiPickersUtilsProvider>
                  <TextField
                    margin="normal"
                    id="birthplace"
                    label="出身地"
                    fullWidth
                    {...register("profile.birthplace")}
                    className={styles.text_field}
                  />
                  <MuiPickersUtilsProvider utils={DateFnsUtils}>
                    <Controller
                      control={control}
                      name="profile.joinCompanyDate"
                      render={({ field }) => {
                        return (
                          <KeyboardDatePicker
                            margin="normal"
                            id="joinCompanyDate"
                            label="入社年月日"
                            format="MM/dd/yyyy"
                            value={field.value}
                            onChange={(data) => field.onChange(data)}
                            fullWidth
                          />
                        );
                      }}
                    />
                  </MuiPickersUtilsProvider>
                </Grid>
              </Grid>
              <Grid container spacing={3} item xs={12}>
                <Grid item xs={12}>
                  <TextField
                    margin="normal"
                    id="github"
                    label="GitHub"
                    fullWidth
                    {...register("profile.githubUrl")}
                    className={styles.text_field}
                    InputProps={{
                      startAdornment: (
                        <InputAdornment position="start">
                          <GitHubIcon />
                        </InputAdornment>
                      ),
                    }}
                  />
                  <TextField
                    margin="normal"
                    id="twitter"
                    label="Twitter"
                    fullWidth
                    {...register("profile.twitterUrl")}
                    className={styles.text_field}
                    InputProps={{
                      startAdornment: (
                        <InputAdornment position="start">
                          <TwitterIcon />
                        </InputAdornment>
                      ),
                    }}
                  />
                  <TextField
                    margin="normal"
                    id="facebook"
                    label="Facebook"
                    fullWidth
                    {...register("profile.facebookUrl")}
                    className={styles.text_field}
                    InputProps={{
                      startAdornment: (
                        <InputAdornment position="start">
                          <FacebootIcon />
                        </InputAdornment>
                      ),
                    }}
                  />
                  <TextField
                    margin="normal"
                    id="instagram"
                    label="Instagram"
                    fullWidth
                    {...register("profile.instagramUrl")}
                    className={styles.text_field}
                    InputProps={{
                      startAdornment: (
                        <InputAdornment position="start">
                          <InstagramIcon />
                        </InputAdornment>
                      ),
                    }}
                  />
                  <TextField
                    margin="normal"
                    id="web"
                    label="Web"
                    fullWidth
                    {...register("profile.webUrl")}
                    className={styles.text_field}
                    InputProps={{
                      startAdornment: (
                        <InputAdornment position="start">
                          <WebIcon />
                        </InputAdornment>
                      ),
                    }}
                  />
                </Grid>
              </Grid>
            </Grid>
          </CardContent>
          <Box component="span" m={2} className={styles.button_wrapper}>
            <Button
              type="submit"
              variant="contained"
              color="primary"
              className={styles.submit_button}
            >
              SUBMIT
            </Button>
            <Button
              type="button"
              variant="contained"
              color="secondary"
              onClick={() => null}
              className={styles.cancel_button}
            >
              CANCEL
            </Button>
          </Box>
        </Card>
      </form>
    </div>
  );
};
export default ProfileFormCard;これでreact-hook-formも終わりじゃな!
【おまけ】storeからデータを取得して、画面に表示してみよう!
せっかく作ったので動作確認をしておきたいですよね。
redux-toolkitで作成していたSelectorを利用して、画面にデータを表示してみましょう!
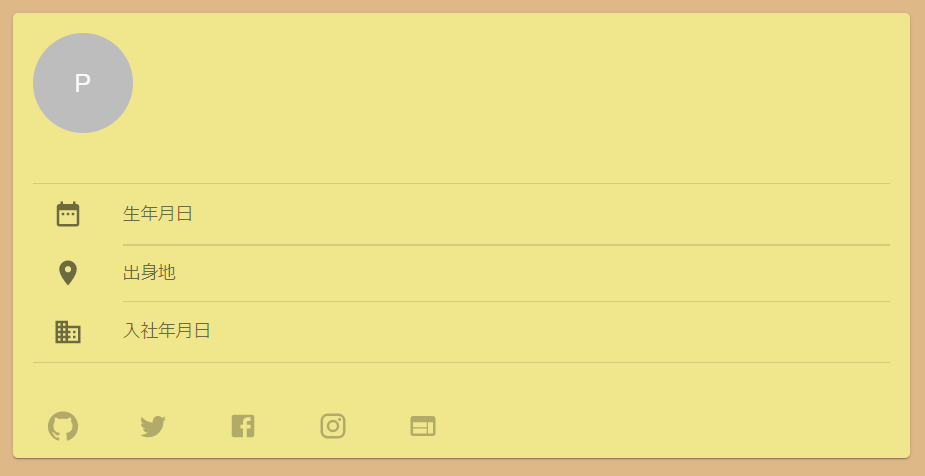
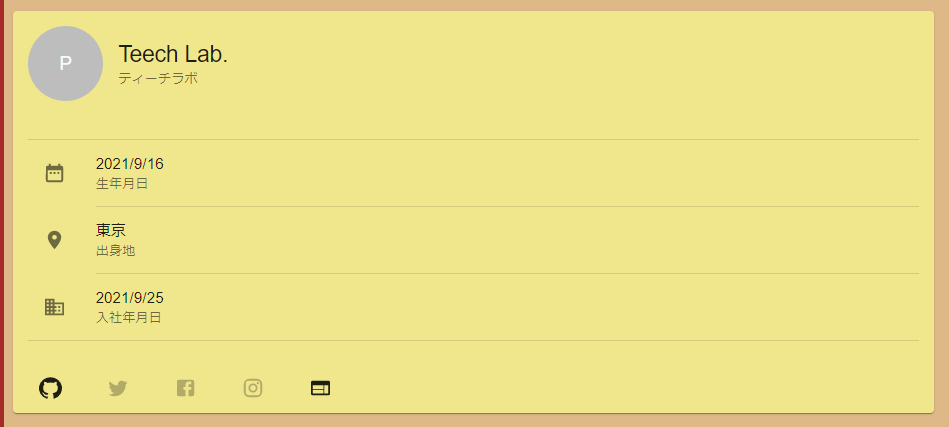
表示するコンポーネントを作成する。
下記のコンポーネントを作成します。
同一ページでもいいので、表示できる場所で呼び出しておきましょう。
useAppSelectorでsliceのselectProfileを呼び出すことでデータを取得しています!
あとは、データを使って表示しているだけなのでコードをみてもらえればいいと思います。
const profile = useAppSelector(selectProfile);ProfileCard.tsx
import React from "react";
// hook
import { useAppSelector } from "../../../../app/hooks";
// react-router-dom
import { Link } from "react-router-dom";
// material-ui
import {
  Card,
  CardHeader,
  Avatar,
  CardContent,
  List,
  ListItem,
  ListItemIcon,
  ListItemText,
  Divider,
  Box,
  CardActions,
  Button,
  IconButton,
  Typography,
} from "@material-ui/core";
import {
  DateRange as DateRangeIcon,
  Room as RoomIcon,
  Business as BusinessIcon,
  GitHub as GitHubIcon,
  Twitter as TwitterIcon,
  Facebook as FacebookIcon,
  Instagram as InstagramIcon,
  Web as WebIcon,
} from "@material-ui/icons";
// styles
import styles from "./ProfileCard.module.scss";
// component
import { selectProfile } from "../../../../features/profile/profileSlice";
const ProfileCard = (): JSX.Element => {
  const profile = useAppSelector(selectProfile);
  return (
    <div className={styles.root}>
      <Card className={styles.card}>
        <CardHeader
          avatar={<Avatar className={styles.avatar}>P</Avatar>}
          title={<Typography variant="h5">{profile?.name}</Typography>}
          subheader={profile?.kana}
          className={styles.card_header}
        />
        <CardContent className={styles.card_content}>
          <List>
            <Divider component="li" />
            <ListItem>
              <ListItemIcon>
                <DateRangeIcon />
              </ListItemIcon>
              <ListItemText
                primary={
                  profile?.birthday
                    ? profile?.birthday.toLocaleDateString()
                    : ""
                }
                secondary="生年月日"
              />
            </ListItem>
            <Divider variant="inset" component="li" />
            <ListItem>
              <ListItemIcon>
                <RoomIcon />
              </ListItemIcon>
              <ListItemText primary={profile?.birthplace} secondary="出身地" />
            </ListItem>
            <Divider variant="inset" component="li" />
            <ListItem>
              <ListItemIcon>
                <BusinessIcon />
              </ListItemIcon>
              <ListItemText
                primary={
                  profile?.joinCompanyDate
                    ? profile?.joinCompanyDate.toLocaleDateString()
                    : ""
                }
                secondary="入社年月日"
              />
            </ListItem>
            <Divider component="li" />
          </List>
        </CardContent>
        <CardActions>
          <Button
            disabled={!profile?.githubUrl ? true : false}
            href={profile?.githubUrl ? (profile?.githubUrl as string) : ""}
          >
            <GitHubIcon />
          </Button>
          <Button
            disabled={!profile?.twitterUrl ? true : false}
            href={profile?.twitterUrl ? (profile?.twitterUrl as string) : ""}
          >
            <TwitterIcon />
          </Button>
          <Button
            disabled={!profile?.facebookUrl ? true : false}
            href={profile?.facebookUrl ? (profile?.facebookUrl as string) : ""}
          >
            <FacebookIcon />
          </Button>
          <Button
            disabled={!profile?.instagramUrl ? true : false}
            href={
              profile?.instagramUrl ? (profile?.instagramUrl as string) : ""
            }
          >
            <InstagramIcon />
          </Button>
          <Button
            disabled={!profile?.webUrl ? true : false}
            href={profile?.webUrl ? (profile?.webUrl as string) : ""}
          >
            <WebIcon />
          </Button>
        </CardActions>
      </Card>
    </div>
  );
};
export default ProfileCard;
ProfileCard.module.scss
.root {
  .card {
    background-color: khaki;
  }
  .avatar {
    width: 80px;
    height: 80px;
  }
}
動作確認をする!

画面からデータを入力して、正しく反映されるか確認していきましょう!
まず、初期表示は何もない状態ですね。
入力フォームに移動して、データを入力後、SUBMITボタンを押下しましょう!
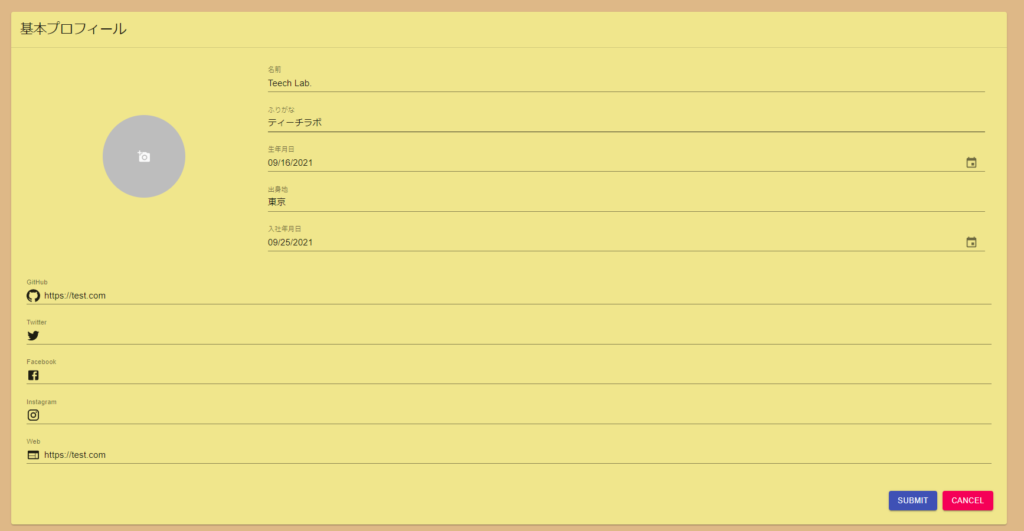
入力した内容が反映されれば完了です!
 クマじい
クマじい大変じゃったな。。。
まとめ
今回は、React + TypeScriptのアプリケーションにredux-toolkitとreact-hook-formを導入して、実際に利用してみました。
正直Reduxを使ったことがない人にとっては、すごく難しい内容だったのではないかなと思います。
ただ今後、React開発していく上では必須となってくる技術なのでぜひ勉強してみてください!
本記事はReact・TypeScript・Redux Toolkitの利用を前提に実装をしていきます。
構築からデプロイまでやっていきますので、必要に応じて他の記事も参考にしてみてください。
また、今回のReactを勉強するにあたり利用した教材をあげています。
主に本(Amazon Unlimitedを含む)とUdemyの動画教材を利用しています。ここには私なりに理解した内容をもとに独自に内容を考えて共有しているので興味ある方は、本やUdemyを購入して勉強してみることをおすすめします。
学習に使った本はこちら!
クマじいAmazon Kindle Unlimited でもReactの本はいっぱいあるぞ!