
小中学生から大人まで幅広い年代層に大人気のゲーム「Minecraft」を使って、プログラミングをするための環境を作っていきたいと思います!
普段Minecraftを遊んでいるパソコンがあれば、簡単にできるのでぜひ参考にしてみてください!
Minecraftでプログラミングするために、MakeCode(Code Connection)というビジュアルプログラミング言語を利用できるアプリをインストールします。
Scratchに似ているので、小学生でも楽しくプログラミングを学ぶことができると思います!
今回は、プログラミングをするわけではなく、プログラミングをするための環境を作る段階の説明になります。
小さなお子様だと難しいことが多いので、できるだけ大人の方と一緒にやってもらえるといいと思います!
 クマじい
クマじい大人でも大変じゃぞ。
パソコンで遊べるMinecraftには、「Windows10版(統合版)」と「Java版」と呼ばれる2種類が存在します。
今回は「Windows10版」を利用しますので、Windows10版(統合版)をインストールしていない方は、「マイクラ購入からダウンロード、インストールまでを画像付きで簡単解説!」を参考にしてインストールしてみてください。
もし、Java版しか持ってなくてどうしてもJava版でプログラミングがしてみたいと思っている方がいれば、「MinecraftとScratch3.0を使ったプログラミング環境の作成」という記事もありますので参考にしてみてください。
Windows10版より複雑ですがScratchを使って学ぶことが可能です!
Minecraftで何を建築するか迷ったら、Kindle Unlimitedがおすすめ!
Minecraftの建築のアイデア集などもたくさん読めるのでぜひ参考にしてみてください!
 クマじい
クマじいこんな本も読み放題じゃ!!
Code Connectionをインストールしよう!
では早速、Code Connectionをインストールして、Minecraftでプログラミングができるようにしていきます!
ここからは、Minecraft Windows10版(統合版)がインストールされている前提で進めていきますので、インストールしていない方は、「マイクラ購入からダウンロード、インストールまでを画像付きで簡単解説!」を参考にしてインストールしてからこちらの記事をみてください!
Microsoft StoreからCode Connectionをインストールしよう!
Code Connectionは、Microsoft Storeからインストールができます!
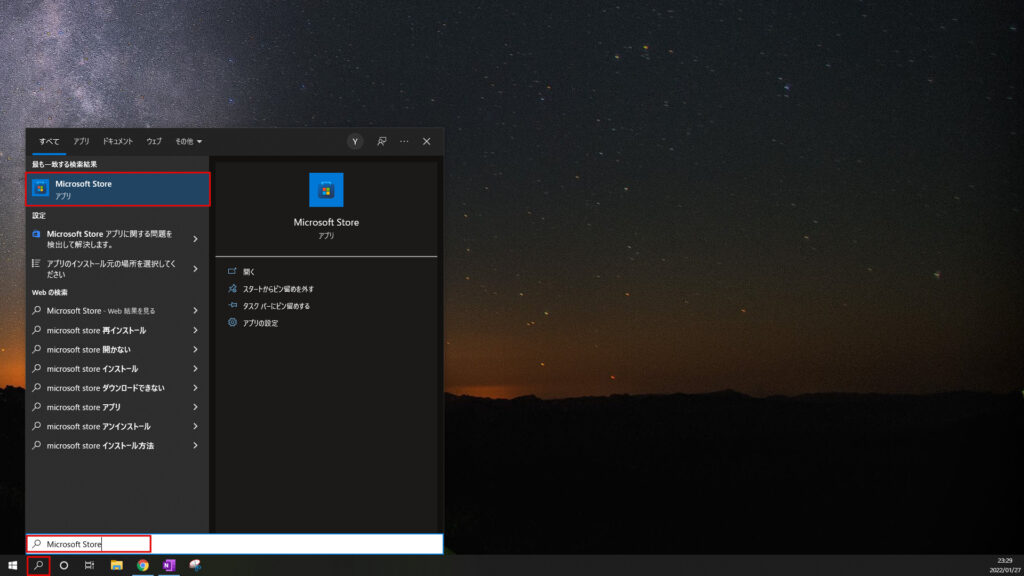
まずはMicrosoft Storeを開きましょう!
スタートの横の「検索」ボタンを選択して、「Microsoft Store」と入力します。
最も一致する検索結果に「Microsoft Store」アプリが出てきますので、ダブルクリックして開きます!
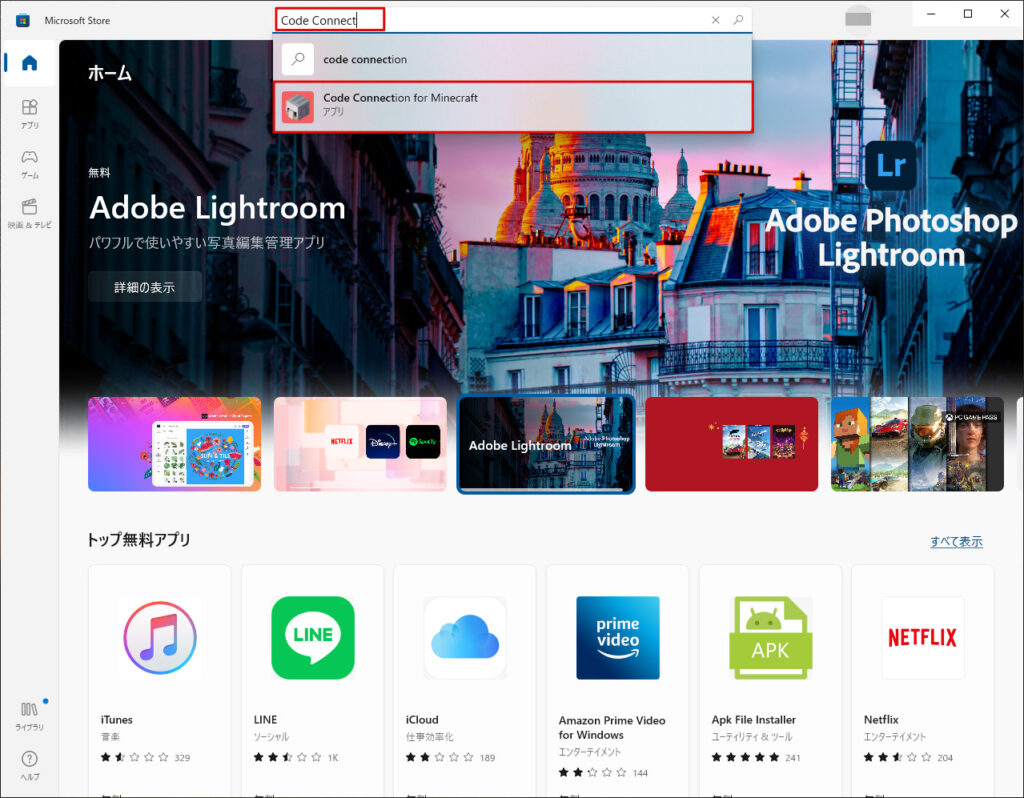
こんな感じでMicrosoft Storeが開いたら、上部の検索フィールドに「Code Connect」と入力してみてください。
赤枠にあるように「Code Connection for Minecraft」が出てきますので、選択します。
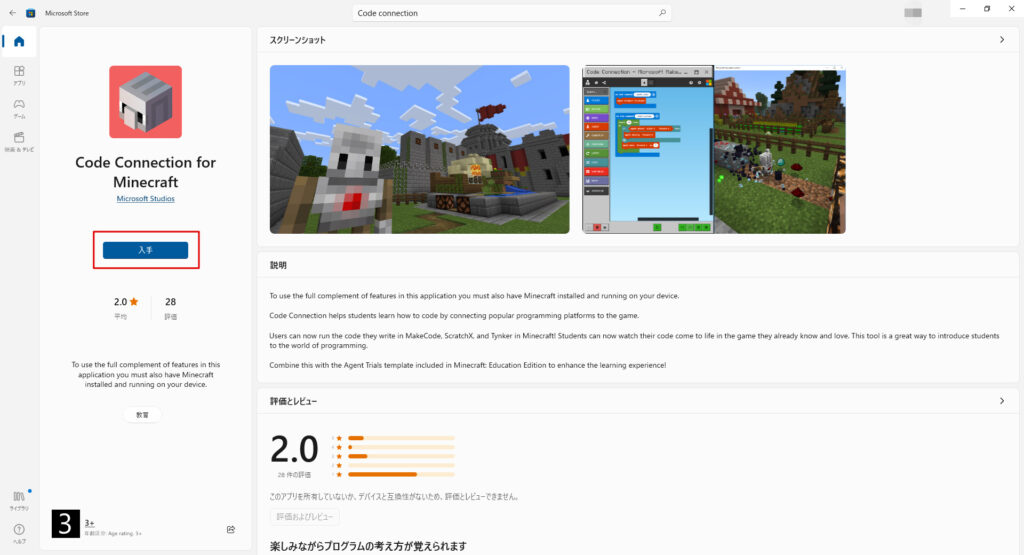
Code Connection for Minecraftが開いたら、「入手」ボタンを選択しましょう!
インストールが始まりますので、少し待ちます。
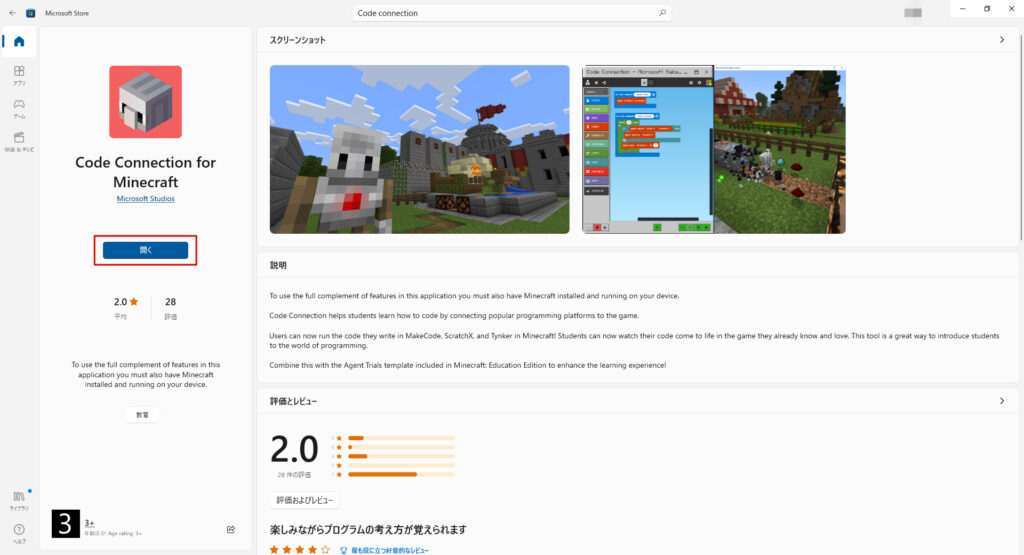
しばらくするとインストールが終わって、「開く」に変わったと思います。
これでインストールは完了です。
Code Connection for Minecraftのショートカットを作成しておこう!
先ほどまででインストールは終わったのですが、デスクトップからCode Connection for Minecraftが開けるほうが便利なので、ショートカットを作成していきます。
一度デスクトップに戻ってもらって、「スタート(Windowsマーク)」を選択します。
最近追加されたものに「Code Connection for Minecraft」が表示されていると思いますので、デスクトップにドラック&ドロップしてみてください。
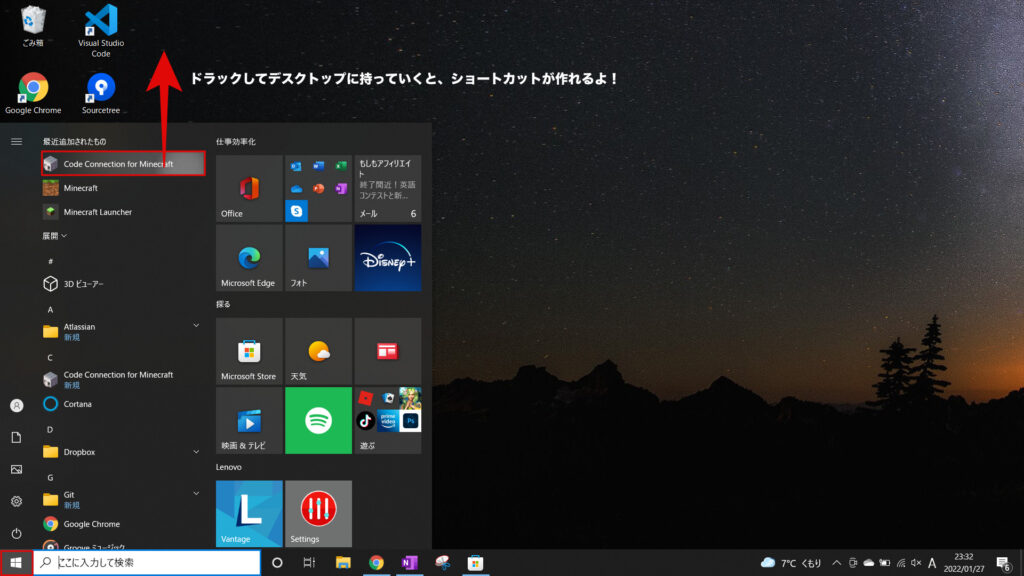
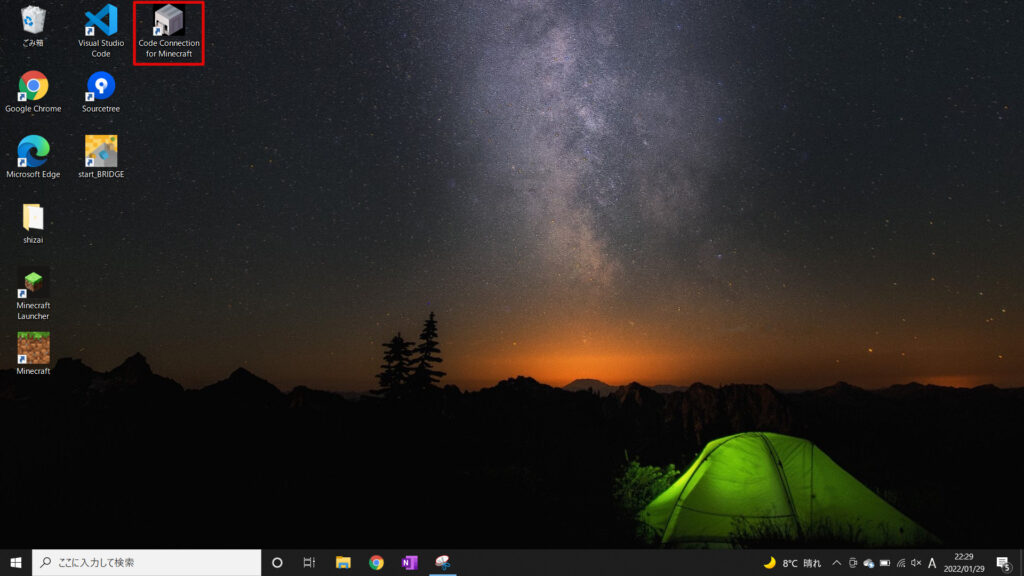
するとCode Connection for Minecraftのショートカットがデスクトップに配置されたと思います。
これでいつでもデスクトップから開けるようになりました!
Minecraft Windows10版と連携してみよう!
ここからは実際にMinecraft Windows10版とCode Connection for Minecraftを連携させてみようと思います!
実際にMinecraftでワールドを作成して、Code Connection for Minecraftの使い方を簡単にまとめていますので、参考にしてみてください。
Minecraftを起動して、ワールドを作成しよう!
まずはMinecraftを起動します!
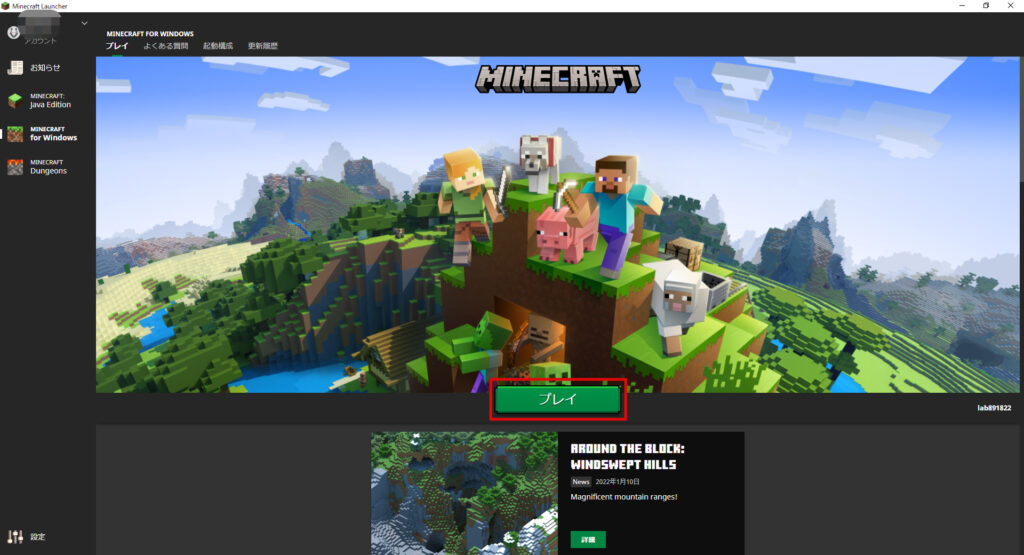
「Minecraft Launcher」をダブルクリックして、起動してください。

Minecraft Launcherが開いたら、「プレイ」を選択してMinecraftを開きます!
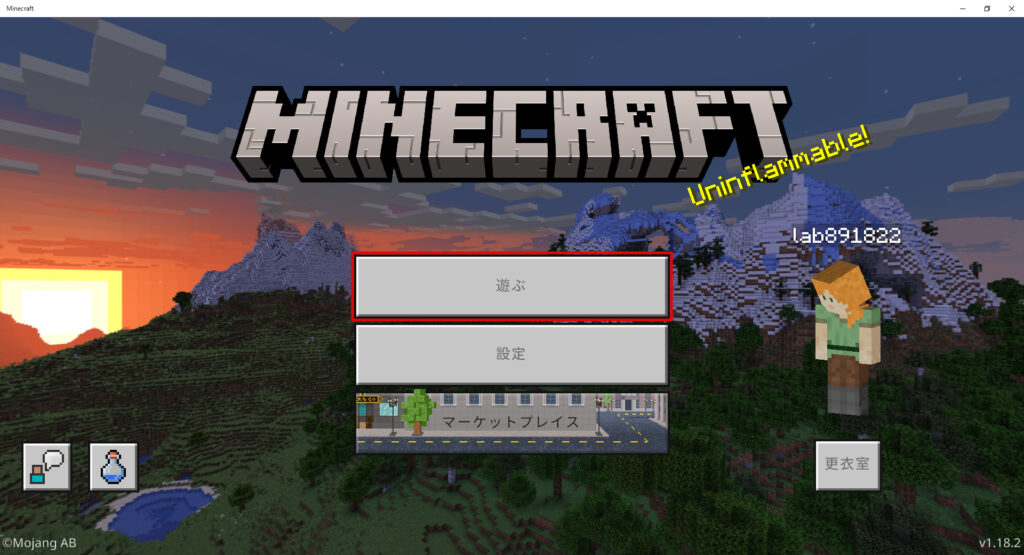
Minecraftが開いたら「遊ぶ」を選択しましょう!
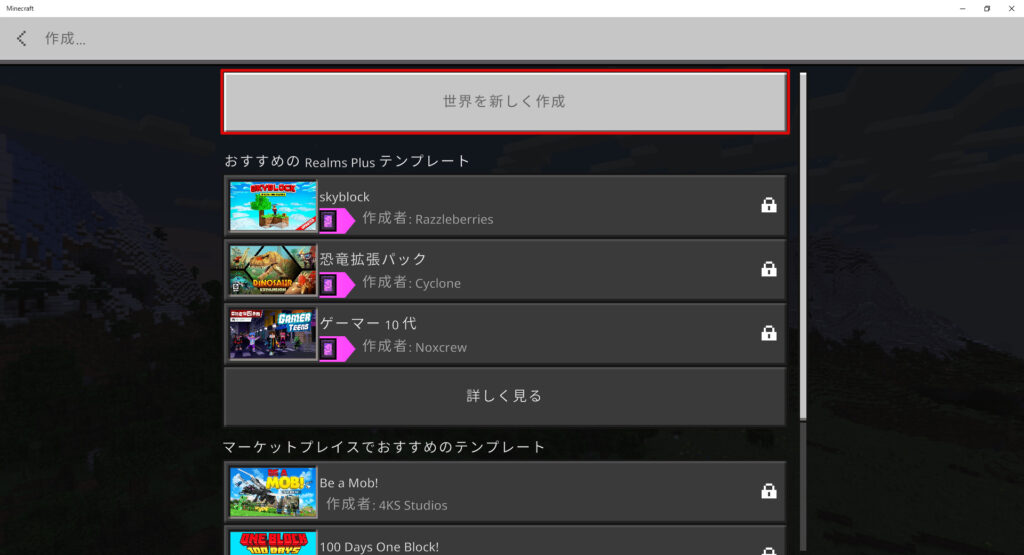
ワールドは新しく作りたいので、「新しく作る」を選択しましょう!

ここも「世界を新しく作る」で大丈夫です!
新しくワールドを作りますが、今回はプログラミング学習なので下記の設定にします。
設定を変更したら、「作る」を選択します!
- 世界の名前:お好きな名前
- デフォルトゲームモード:クリエイティブ
- 難易度:ピース
- 世界のタイプ:フラット
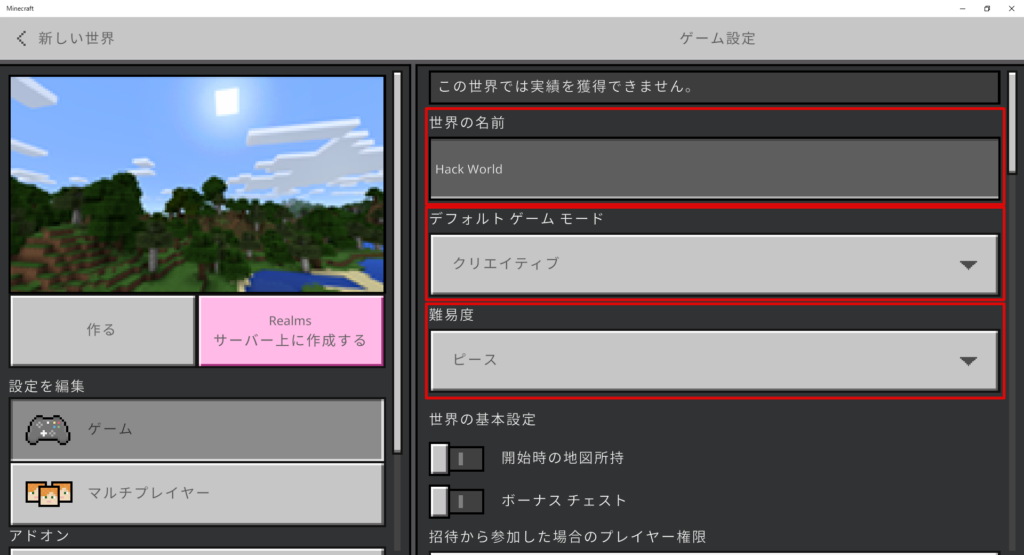
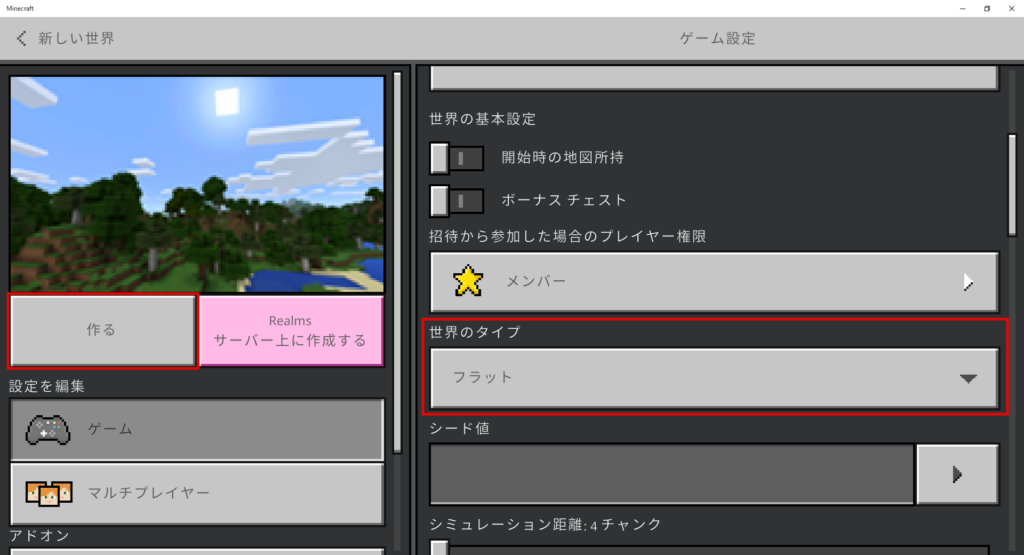
これでプログラミング用のワールドの作成ができました!

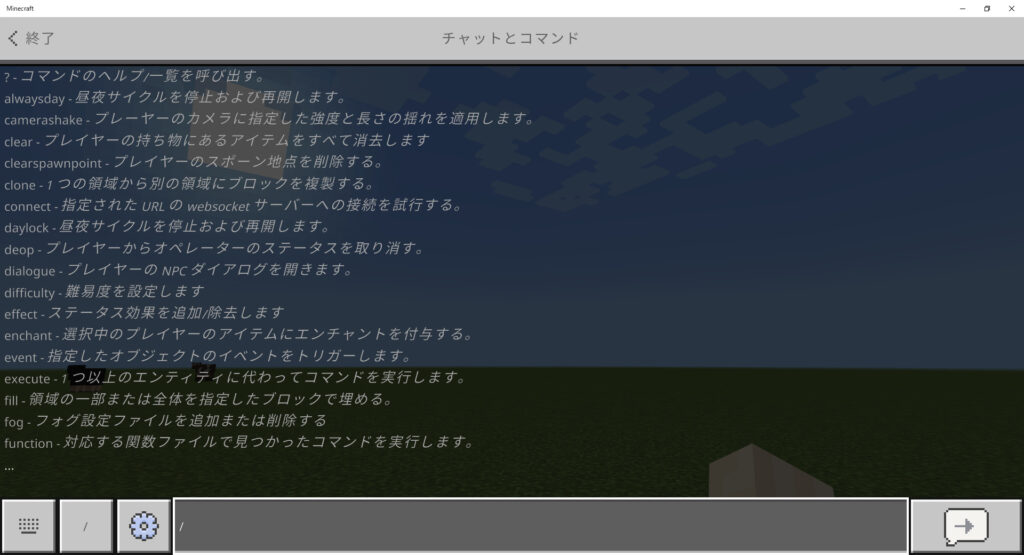
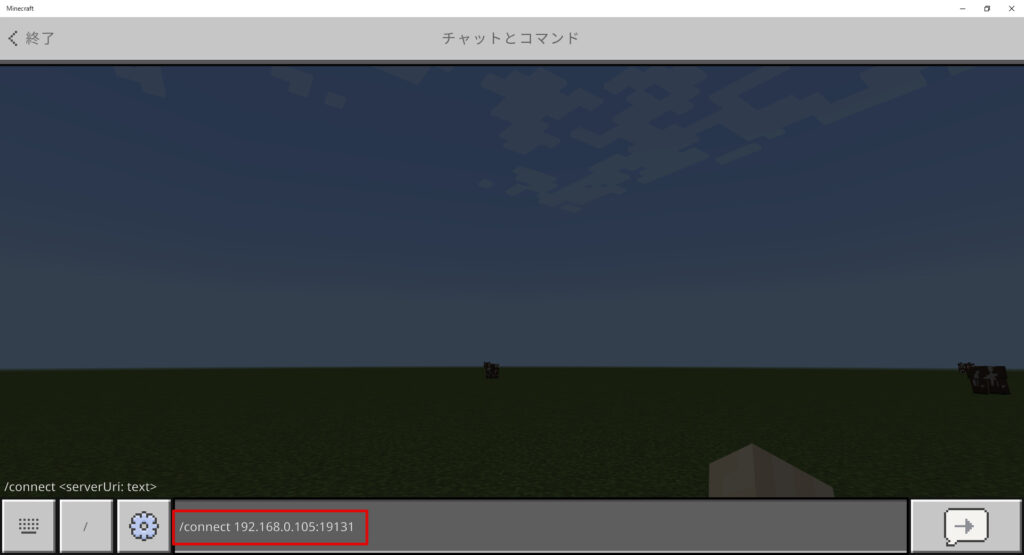
「/」キーを押して、コマンド入力モードにしておきます。
Code Connectionを起動して、Minecraftと接続しよう!
続いては、Code Connection for Minecraftを起動して、Minecraftと接続していきます!
先ほど作成した「Code Connection for Minecraft」のショートカットをダブルクリックして起動します。

Code Connectionの画面が表示されたら、Minecraftで使うコマンドが表示されるので「コピー」ボタンを押してコピーしましょう!
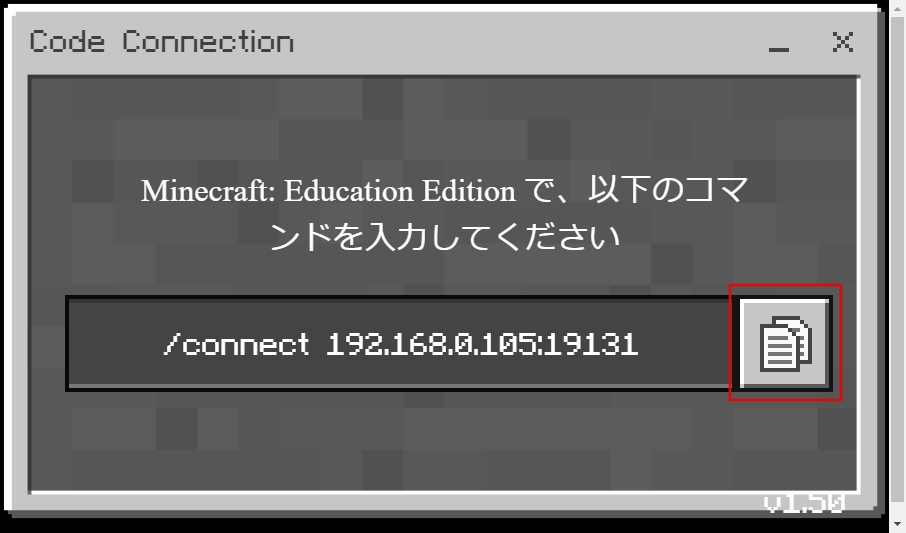
Minecraftに戻って、先ほどコピーしたコマンドをMinecraftに貼り付けます。
貼り付けたら「Enter」キーを押してください。
接続が完了すると、Code Connectionの画面が変わります。
この画面になったら接続は完了です!
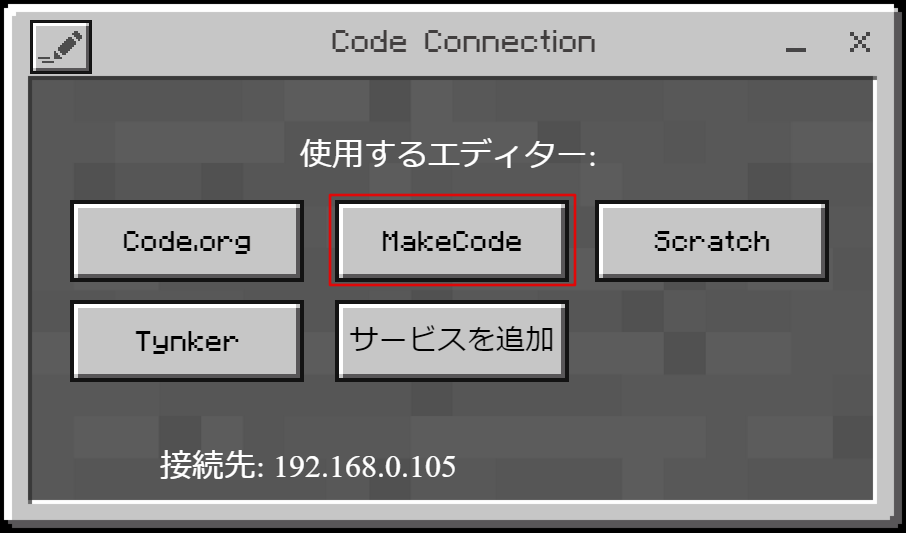
Make Codeを起動して、プロジェクトを作成しよう!
ここまでできたらMake Codeを利用して、簡単なプログラミングを書いて動作確認してみましょう!
「Make Code」を選択して、エディターを起動しましょう!
Make Codeの画面が出ますので、「新しいプロジェクト」を選択します!
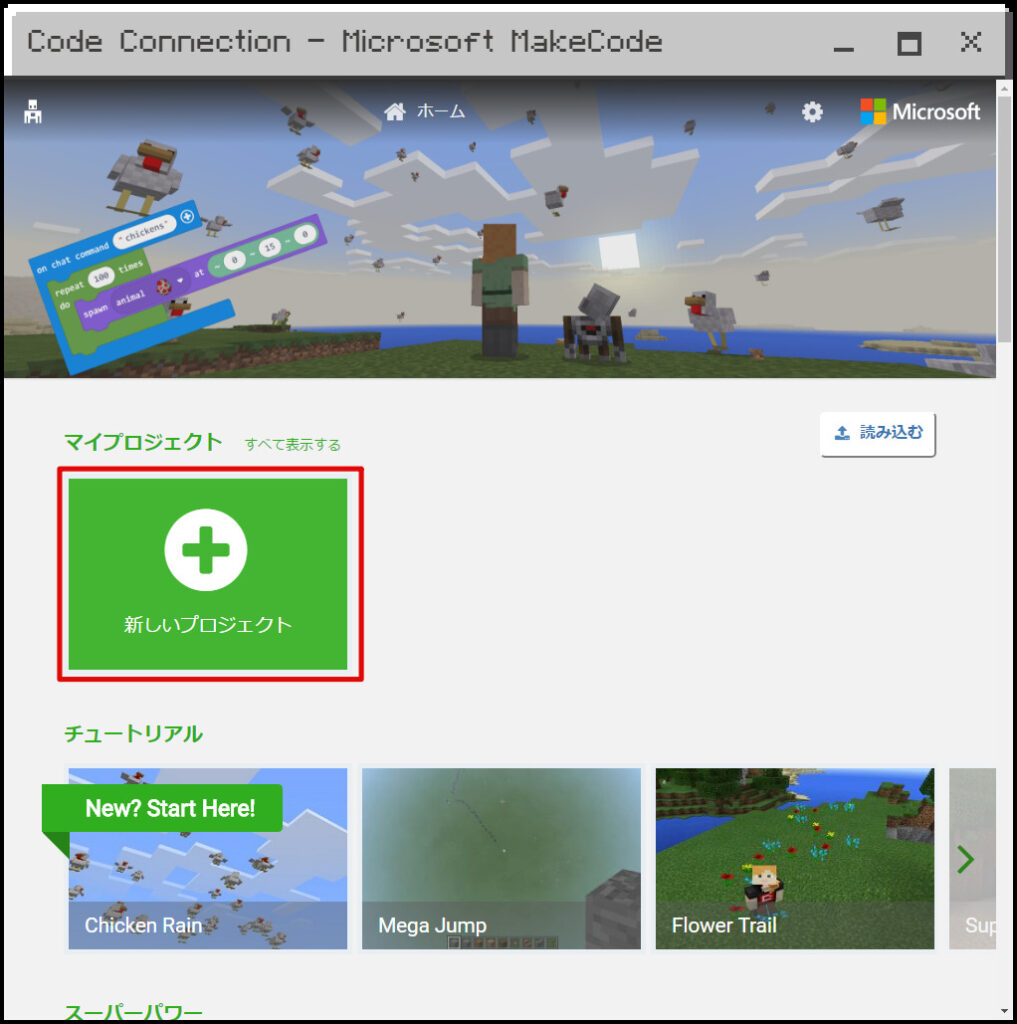
プロジェクトに名前をつける必要がありますが、ここはお好きな名前で大丈夫です!
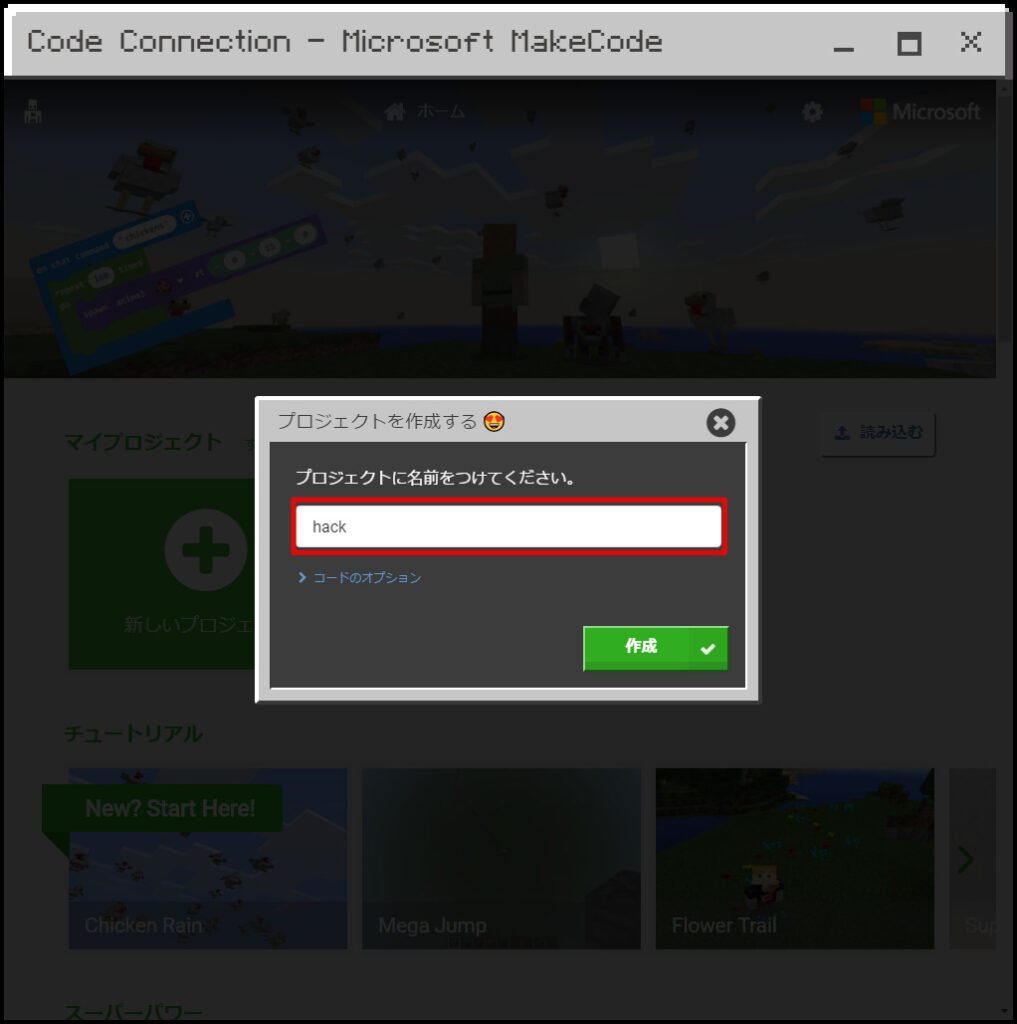
こんな感じでプロジェクトが作成できれば完了です!

Minecraft Windows10とMakeCodeを使ってプログラミングしてみよう!
ここまでできたら動作確認という意味も込めて、簡単なプログラミングをしてみましょう!
プログラミングする内容は、下記の通りです。
- チャットで「ジャンプ」を送信したら処理を開始する。
- プレイヤーの位置を「0,0,0」にテレポートさせる。
- ブロックを「1,1,1」に置く。
ジャンプを押したら、プレイヤーの目の前にブロックが表示されていれば動作確認は完了になります!
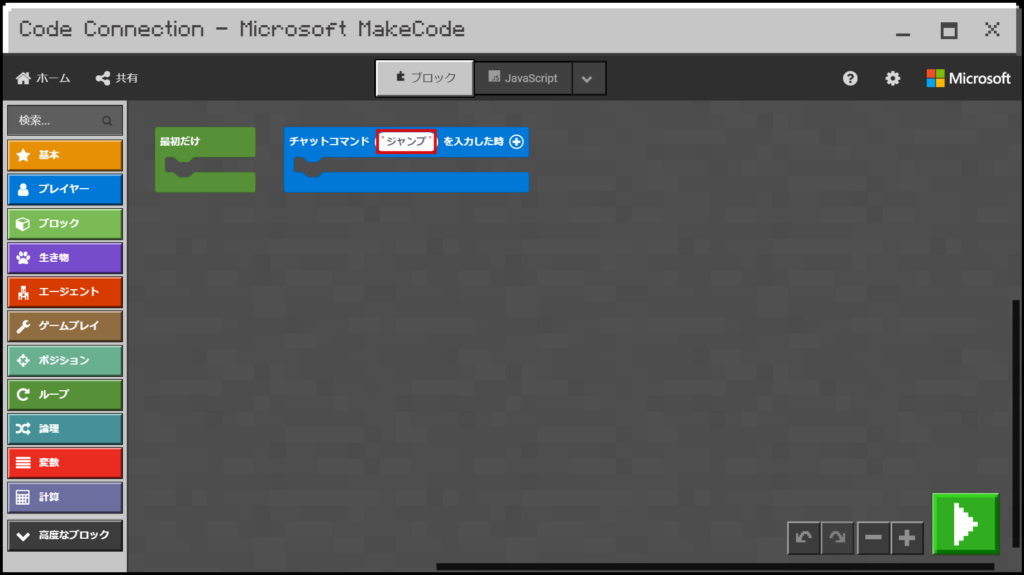
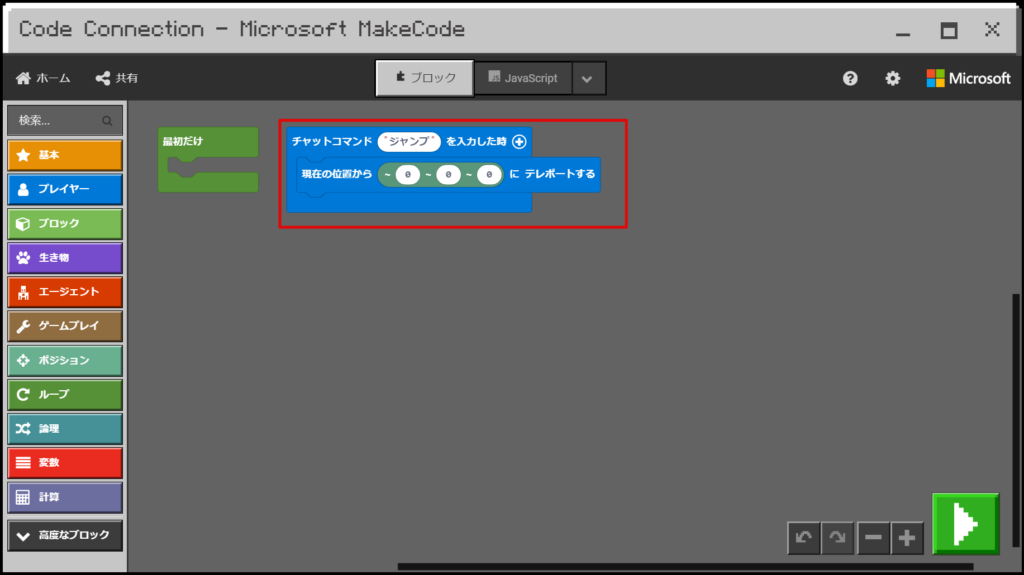
チャットで「ジャンプ」を送信したら処理を開始する。
まずはチャットでジャンプを送信したら処理を開始するようにしていきましょう!
使うブロックは、初期である「チャットコマンド”run”を入力した時」です。
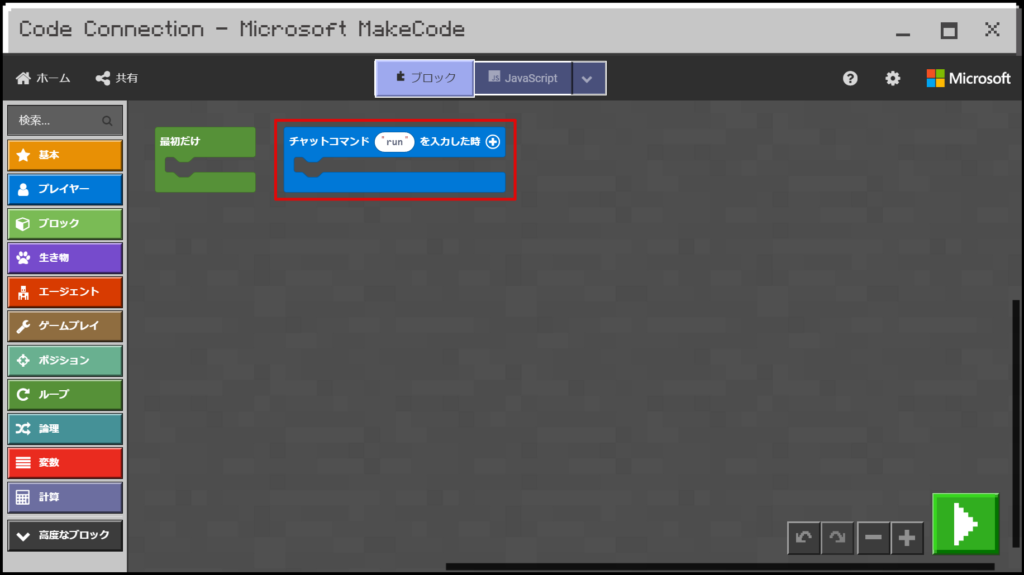
「run」を「ジャンプ」に書き換えてください。
処理を開始するためのブロックはこれでだけです!
プレイヤーの位置を「0,0,0」にテレポートさせる。
続いては、プレイヤーの位置を「0,0,0」にテレポートさせます。
0,0,0が何を指しているかというと、「x,y,z」の位置情報です。
Minecraftは、0,0,0を起点に数字が割り振られています。
具体的な説明は今回は省きますが、簡単に説明すると下記にような感じです。
では「0,0,0」にプレイヤーをテレポートさせるためのブロックを配置しましょう!
「プレイヤー」を選択して、「現在の位置から(~0~0~0)にテレポートする」ブロックをドラック&ドロップしてください。
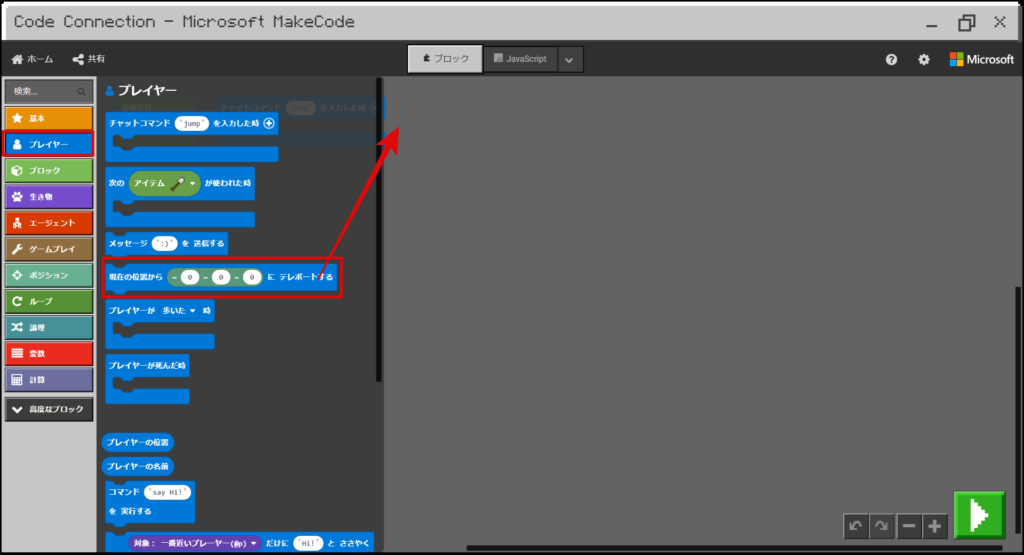
先ほどの「チャットコマンド”ジャンプ”を入力した時」の間に入れたら処理は完了です。
ブロックを「1,1,1」に置く。
続いてはプレイヤーの目の前にブロックを置く処理を追加していきましょう。
「ブロック」から「ブロックを(~0~0~0)の地点に置く」ブロックをドラック&ドロップしてきます。
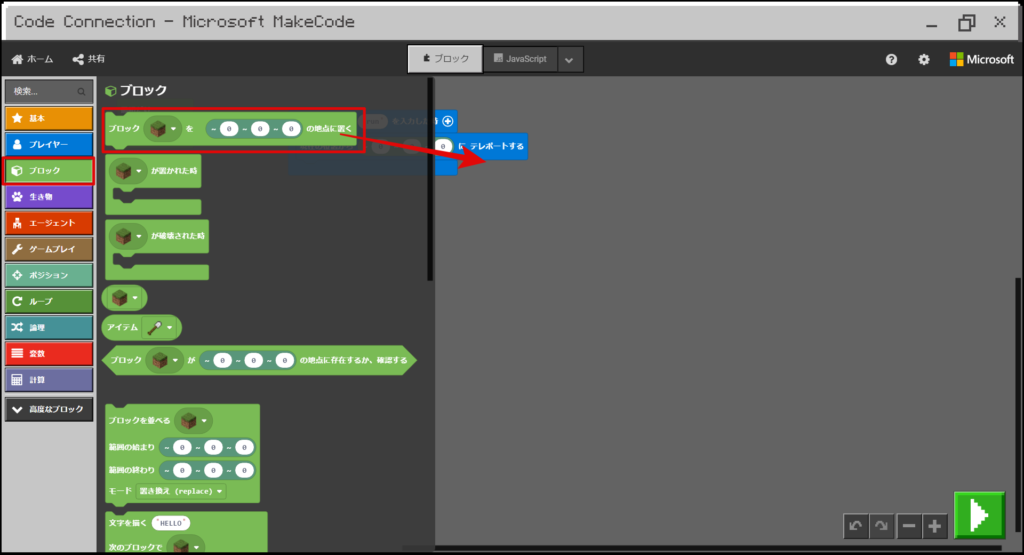
先ほどと同様に「現在の位置から(~0~0~0)にテレポートする」ブロックの下に配置します。
ただこのままだと(0,0,0)に配置することになってしまいますね。
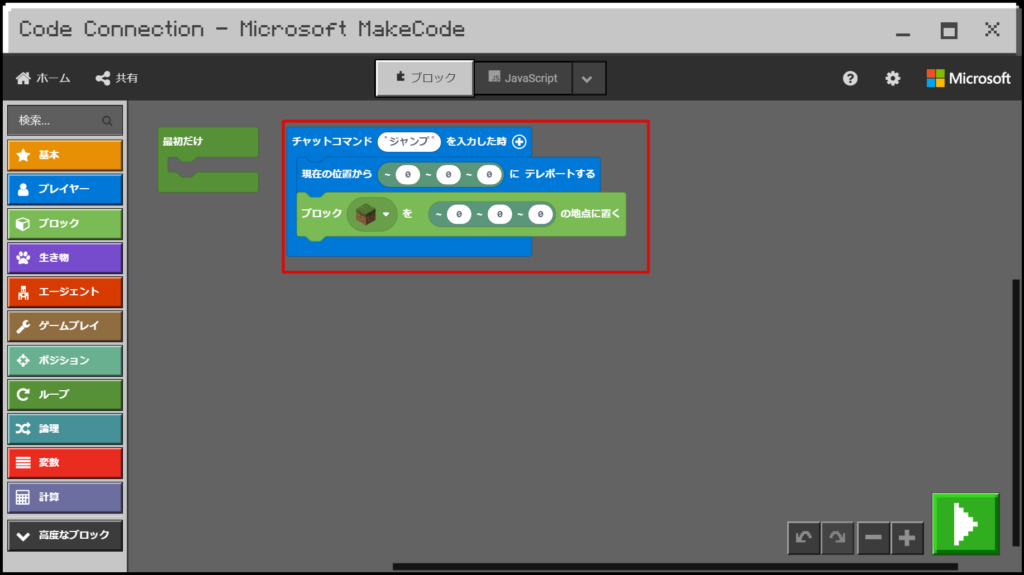
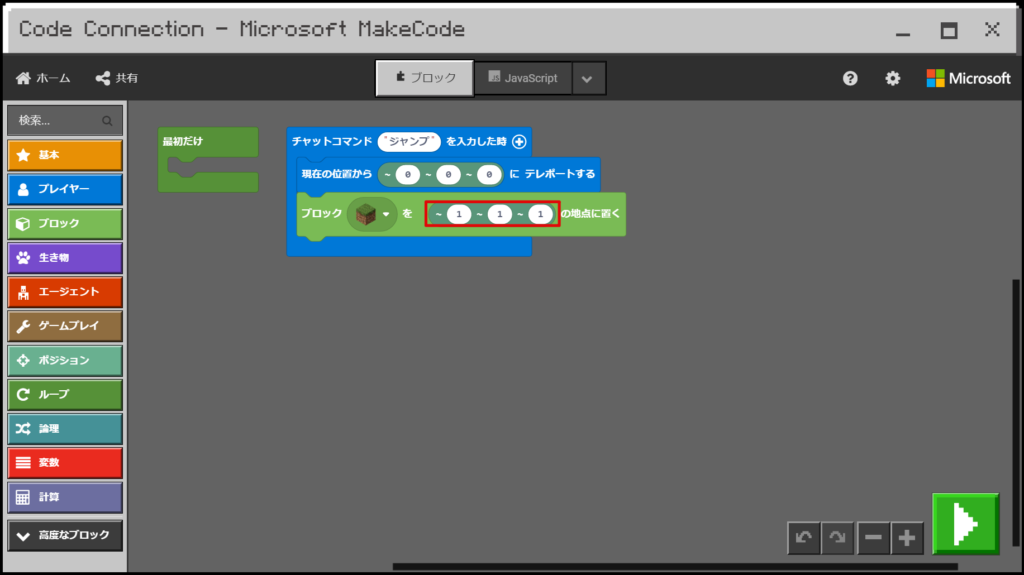
ブロック配置を画像のように「1,1,1」に変更しましょう!
これでブロックがプレイヤーの目の前(正確には、右1、前1、上1の場所)に表示されると思います。
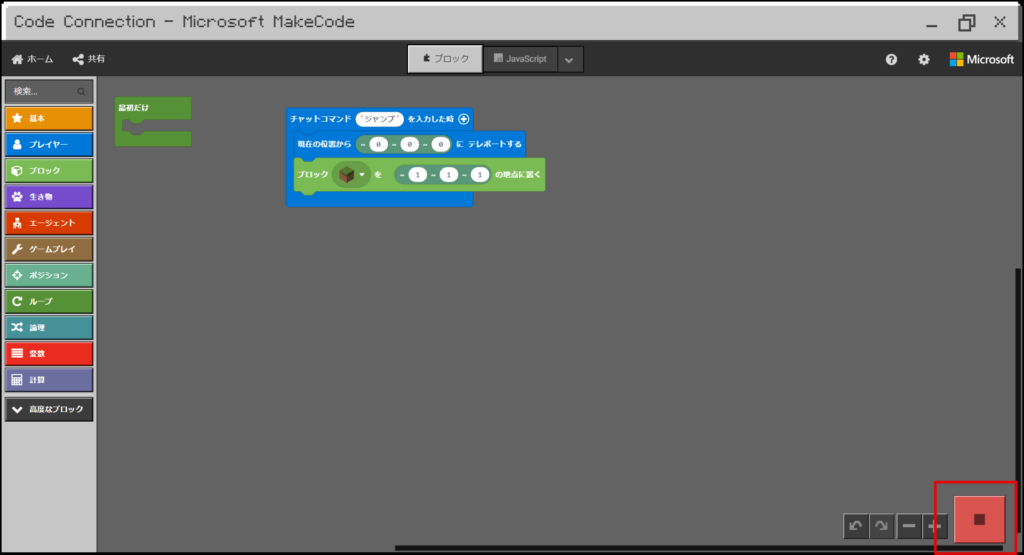
Make Codeで実行しておく!
チャットでジャンプを送信したら処理を開始させるには、Make Codeで実行しておく必要があります。
右下の「▶︎」ボタンを押しましょう!
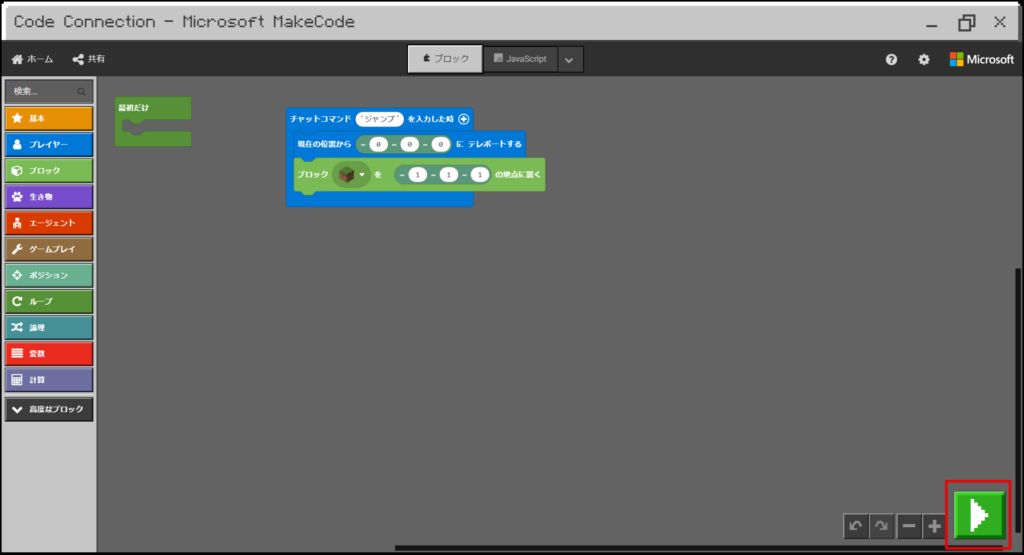
こんな感じで赤くなって「■」になっていれば大丈夫です!
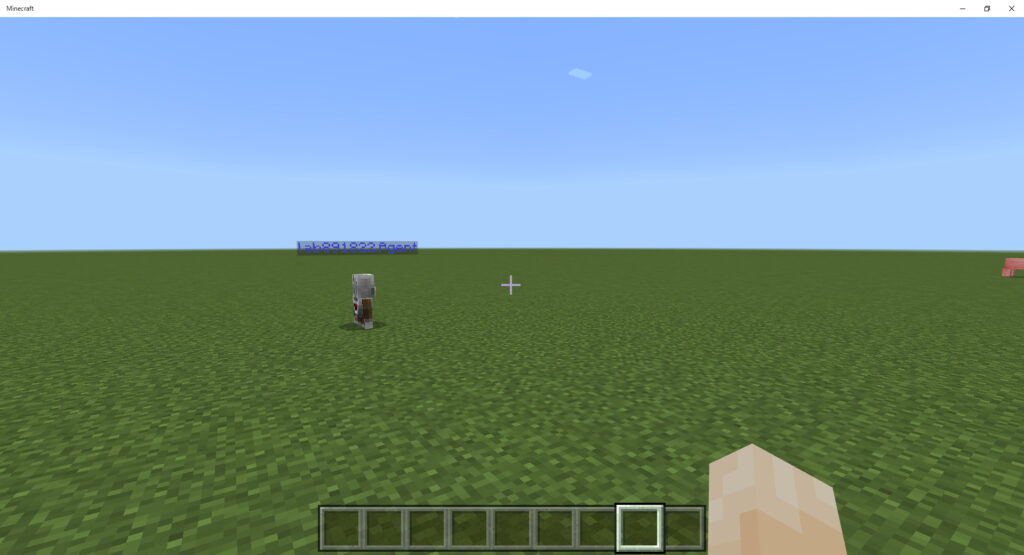
Minecraftで処理を開始してみよう!
これで最後になります!!
Minecraftでチャットにジャンプを送信して、処理を実行しましょう!
まずはマイクラの画面に戻ります。
この時はまだ、何もない状態ですね。
「T」キーを押して、チャット画面を開きましょう!
ここで「ジャンプ」と入力します。
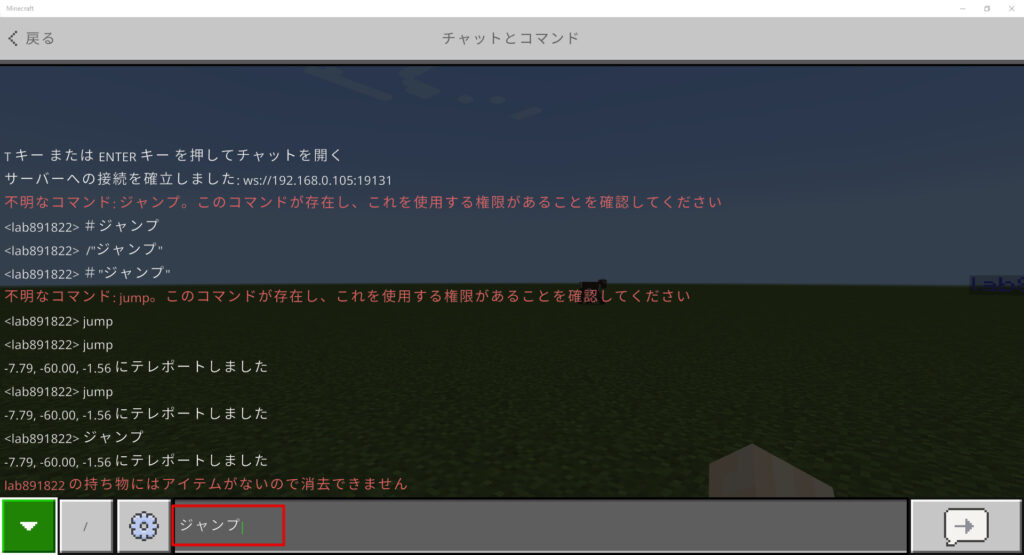
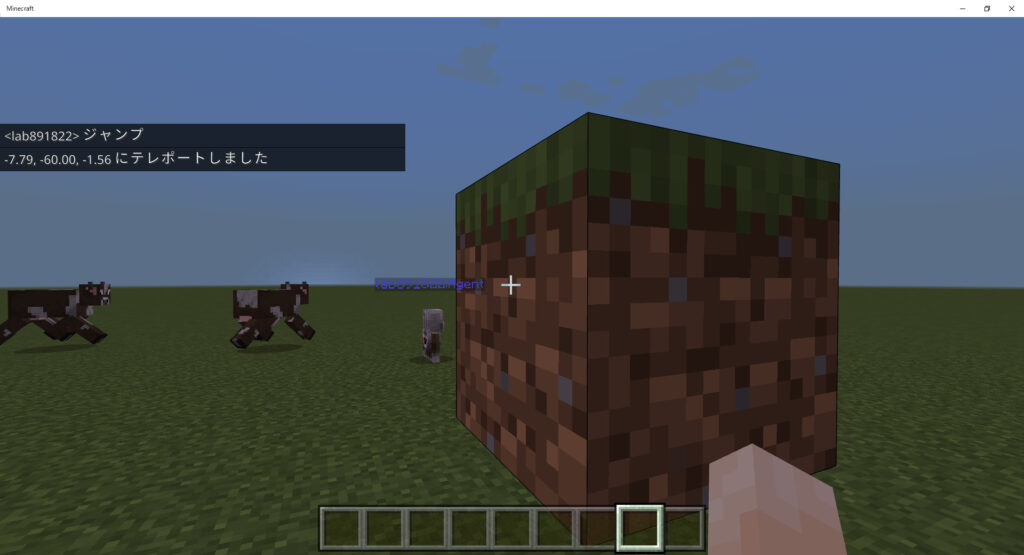
「Esc」キーを押して、Minecraftの画面を見ると目の前にブロックが表示されていることを確認できましたね!!
これで実際に連携して動いていることを確認できました!
 クマじい
クマじいほんとにブロックが置かれてるとは驚きじゃ!!
Minecraft Windows10とMakeCodeを使って色々建築してみよう!
ここまでできればプログラミングを勉強しながら、色々建築することが可能です。
ぜひお好きなものをプログラミングで建築してみてください!
私もMinecraft Windows10とMakeCodeを使ったサンプルを作成しています。
次何をしようか迷った方や、子供にどうやって教えたらいいか迷っている方は、ぜひ参考にしてみてください!
Minecraftで何を建築するか迷ったら、Kindle Unlimitedがおすすめ!
Minecraftの建築のアイデア集などもたくさん読めるのでぜひ参考にしてみてください!
クマじいこんな本も読み放題じゃ!!
 クマじい
クマじいプログラミングを楽しむんじゃぞ!