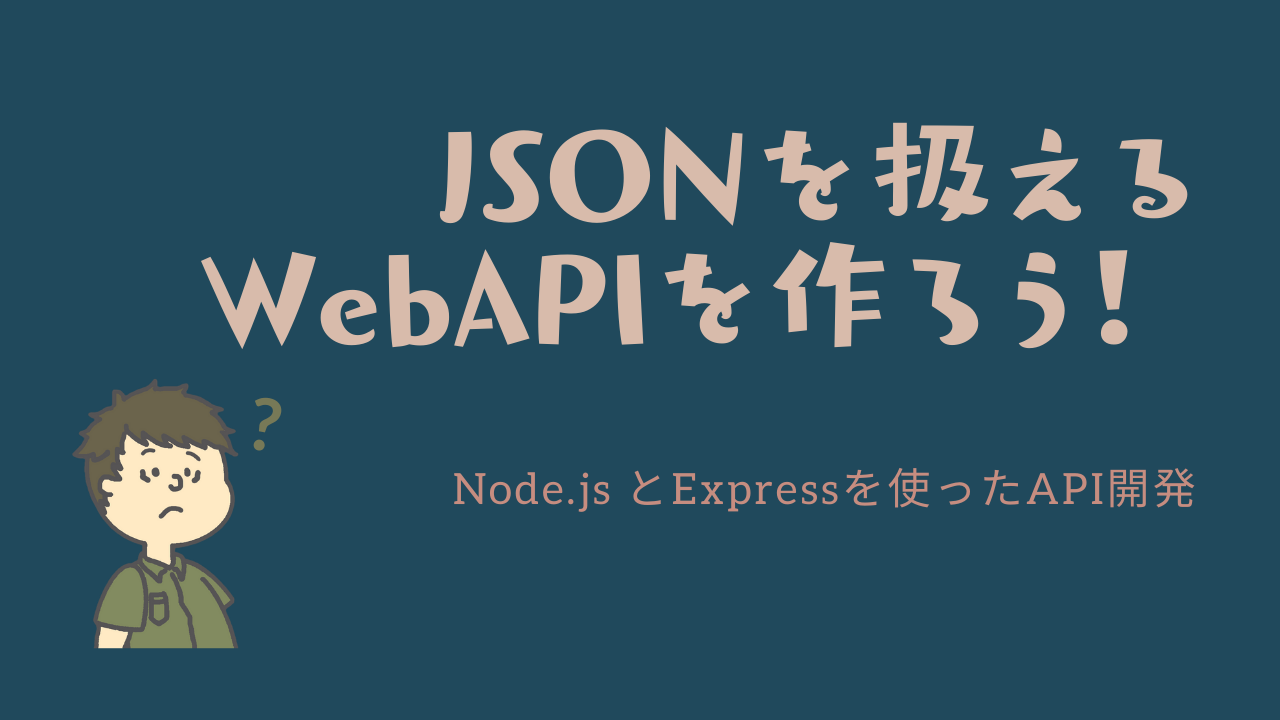
今回は、JavaScriptをサーバサイドで動かす事ができるフレームワーク「node.js」を使って、JSON形式でリクエスト・レスポンスができるAPIを作っていこうと思います!
学習に使った本はこちら!
 クマじい
クマじいAmazon Kindle Unlimited でもNode.jsの本はいっぱいあるんじゃ!!
もし、まだnode.jsをインストールしておらず、express-generatorで雛形のアプリケーションを作成できていない方は、こちらを参考に雛形のアプリケーションを作ってから見ていただくのがいいと思います!
なるべく簡単に説明していきますので、是非参考にしてくれると嬉しいです!
- Node.jsでAPIを作ってみたい!
- Node.jsでJSONを扱ってみたい!
- JSONってなんですか?
-
JSONは、JavaScriptのオブジェクト記法を用いたデータ交換のフォーマットです。
各アプリケーションやプログラミング言語間でのデータ受け渡しが楽になります。
JavaScriptはもちろんのこと、JavaやPythonなど様々な言語でサポートされています。JSONが登場する前は、XMLというHTMLの記法を元にしたデータ構造が使われていましたが、XMLは理解するのが難しく、JSONが使われる事が多いです。
JSON形式のレスポンスを返すWebAPIを作ろう!
 クマじい
クマじいAPIって何なんじゃ〜?
そもそもAPIを知らない方も多いと思うので、簡単にAPIを説明しておきます!
- API(Application Programming Interface)
-
異なるソフトウェア・アプリケーションがお互いにやりとりするために使用するインタフェースのこと
- WebAPI
-
APIの利用を、 HTTP/HTTPSで実現するAPIのことをWeb APIと呼びます。
Web APIではないAPIは、APIの利用側が用いるプログラミング言語と同じ言語で提供される事が多いです。(厳密には違いますが、Web APIではないAPIはライブラリのようなものと認識してもいいかもしれません。)
簡単にAPIについておさらいしたところで、早速JSON形式のレスポンスを返すWebAPIを作っていきましょう!
前回のおさらい!
前回は、Node.jsとExpressをインストールして、雛形のアプリケーションを作った状態だと思います!
現状の確認として、一旦実行して確認しておきましょう!
コマンドプロンプトで「npm start」を実行してください!
C:\Users\*****\Documents\sample> npm start実行したら、「http://localhost:3000」をブラウザで開いてみましょう!

このような画面が表示されていたらOKです!
もちろん、この画面ではなくてもNode.jsとExpressで環境構築されていれば参考になると思います!
文字列を返却するWebAPIを作る!
現状の確認をしたので、早速Web APIを作ります。
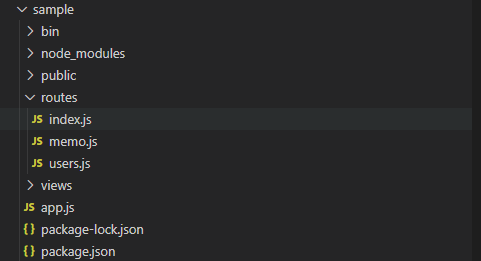
現状のフォルダ構成は、下の画像のようになっていると思います。
「routers」配下に「memo.js」を新規に作成してください!
memo.jsは、下記のように記載します!
memo.js
var express = require('express');
var router = express.Router();

// Hello Worldを返却するAPI
router.get('/', function(req, res, next) {
  res.send('Hello World')
})

module.exports = router;
GETでリクエストが来たら、「Hello World」をレスポンスするだけのAPIです!
しかし、このままではこのAPIを呼び出す事ができません。
次に、app.jsを変更していきます!
マーカーのついている行を追加してみてください!
「/memo」でリクエストされるとmemo.jsが呼び出されます!
app.js
var createError = require('http-errors');
var express = require('express');
var path = require('path');
var cookieParser = require('cookie-parser');
var logger = require('morgan');

var indexRouter = require('./routes/index');
var usersRouter = require('./routes/users');
var memoRouter = require('./routes/memo'); // add

var app = express();

// view engine setup
app.set('views', path.join(__dirname, 'views'));
app.set('view engine', 'jade');
app.use(logger('dev'));
app.use(express.json());
app.use(express.urlencoded({ extended: false }));
app.use(cookieParser());
app.use(express.static(path.join(__dirname, 'public')));

app.use('/', indexRouter);
app.use('/users', usersRouter);
app.use('/memo', memoRouter); // add

// catch 404 and forward to error handler
app.use(function(req, res, next) {
  next(createError(404));
});

// error handler
app.use(function(err, req, res, next) {
  // set locals, only providing error in development
  res.locals.message = err.message;
  res.locals.error = req.app.get('env') === 'development' ? err : {};
  // render the error page
  res.status(err.status || 500);
  res.render('error');
});

module.exports = app;
ここまできたら、RestClientツールで確認してみましょう!!
「http://localhost:3000/memo」をSendすると、「Hello World」が帰ってきたと思います!
今後、確認作業はRestClientを利用します!
Postmanなど色々RestClientツールはありますが、今回は、chromeの拡張機能である「Talend API Tester」を使っていきます!
お好きなRestClientを使っていただければと思います!

ただ、このままだとただの文字列ですね。
次は、JSON形式になるように手を加えていきます!
JSON形式になるように修正する!
先ほどは、文字列だったレスポンスをJSON形式に変更していきます!
変更するのは、「memo.js」です。
memo.js
var express = require('express');
var router = express.Router();

// Hello Worldを返却するAPI
router.get('/', function(req, res, next) {
  res.json({'message': 'Hello World'})
})

module.exports = router;「res.send」と「res.json」は、ほぼ一緒の動きをします。
試しに、上記のコードをres.sendにしてもらっても、同じようにJSONが返却されてくるのを確認できると思います。
では、なぜres.jsonを使うかというと、字下げや置き換えをしてくれたうえで、res.sendしてくれるからです。
JSONを扱う際に、どちらにするか迷ったらres.jsonを使っておけばいいのではないでしょうか!
※res.send(null)の場合、レスポンス結果は空なのですが、res.json(null)の場合、レスポンス結果がnullになるなど置き換えには注意が必要です!
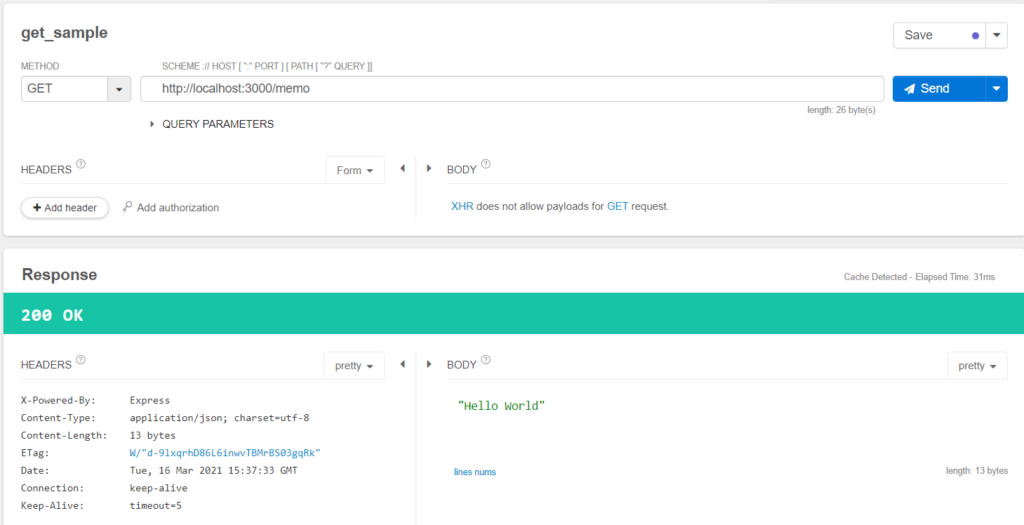
ここまでできたら、改めて確認してみましょう!
しっかり、JSON形式でレスポンスできていると思います!
![get_sample
METHOD
GET
HEADERS
+ Add header
Response
2ØØ OK
HEADERS
X-Powered -By :
Content- Type :
Content- L ength :
ETag:
Date :
Connec tion :
Keep -Alive :
SCHEME HOST [ PORT [ PATH [ QUERY
Save
4 Send
http://localhost:3000/memo
QUERY PARAMETERS
Add authorization
Express
application/json; charset=utf-8
25 bytes
W/ "19-c6Hfa5VVP+Ghysj+6y9cPi5QQbk"
Tue, 16 Mar 2€21 GMT
keep -alive
timeout=5
Form
pretty
BODY
XHR does not allow payloads for GET request.
BODY
message :
lines nums
"Hello World"
length: 26 byte(s)
Cache Detected - Elapsed Time: 62ms
pretty
length: 26 bytes
COMPLETE REQUEST HEADERS
o Top
O Bottom
Open
2Request
Q] Copy
Download](https://teech-lab.com/wp-content/uploads/2021/03/image-17-1024x575.png)
JSON形式のリクエストを受け取るWebAPIを作ろう!
続いて、JSON形式のリクエストを受け取るWebAPIを作っていこうと思います!
POSTでリクエストを受けて、レスポンスを返すWebAPIです。
POSTでリクエストする際に、bodyに下記のJSON形式のデータを入れておきます。
{
  "memo": {
    "id": 1,
    "text": "text"
  }
}
BODYでJSON形式データを受け取れるようにする!
memo.jsを修正していきます!
「req.body.memo.id」でリクエストのBodyにあるJSONデータのmemo>idの値を取得します。
「req.body.memo.text」も同様に、リクエストのBodyにあるJSONデータのmemo>idの値を取得します。
今回は、値をそのままレスポンスとして返却しています。
memo.js
var express = require('express');
var router = express.Router();

// Hello Worldを返却するAPI
router.get('/', function(req, res, next) {
  res.json({message: 'Hello World'})
});

// memoをPOSTで受け取る
router.post('/', function(req, res, next){
  console.log(req.body)
  res.json({
    id: req.body.memo.id,
    text: req.body.memo.text
   })
})

module.exports = router;
続いて、app.jsを確認します!
「app.use(express.json())」を追記することで、JSONオブジェクトを認識できるようになりますので、追記してください。
express-generatorで作っているかであれば、デフォルトで記載されています。
「body-parserをインストールしている」という方がいれば、それでも問題ありません。
express.json()は、body-parserを基にExpress v4.16.0から標準搭載された機能です。
「app.use(express.urlencoded({ extended: true }));」は、Content-Typeに「application/x-www-form-urlencoded」を指定する場合に使います。基本的にはJSONなのでいらないですが、必要に応じて追記してください。
express-generatorで作っているかであれば、デフォルトで記載されています。
「app.use(express.urlencoded({ extended: true }));」を追記する場合は、extendedは「true」にしておくことで配列や入子構造で認識する事が可能になります。
extended:true の場合
![METHOD
SCHEME HOST [ PORT [ PATH [ QUERY
POST
http://localhost:3000/memo
QUERY PARAMETERS
+ Add query parameter
HEADERS -
Content-Type
] = text
+ Add header
Response
2ØØ OK
HEADERS
X-Powered -By :
Content- Type :
Content- L ength :
ETag:
Date :
Connec tion :
Keep -Alive :
Send
Form
application/x-www-form-urlencod x
BODY
memo[id]
memo[text]
+ Add torm parameter
Add authorization
Express
application/json; charset=utf-8
24 bytes
W,' "18-rc6uCp176JIKTLE9t8ULYTckC1s"
Tue, 16 Mar 2€21 GMT -38s
keep -alive
timeout=5
COMPLETE REQUEST HEADERS
Text
Text
application/x-%ww-form-urlencoded
pretty
BODY
id :
text :
lines nums
"text"
o Top
length: 26 byte(s)
2Request
Form
x
x
6
Elapsed Time: 15ms
pretty
length: 24 bytes
O Bottom
Open
Q] Copy
Download](https://teech-lab.com/wp-content/uploads/2021/03/image-22-1024x605.png)
extended:false の場合
![METHOD
SCHEME HOST [ PORT [ PATH [ QUERY
POST
HEADERS -
Content-Type
] = text
+ Add header
Response
http://localhost:3000/memo
QUERY PARAMETERS
+ Add query parameter
Form
application/x-www-form-urlencod x
Add authorization
Send
length: 26 byte(s)
BODY
memo[id]
memo[text]
+ Add torm parameter
Text
Text
application/x-%ww-form-urlencoded
Form
x
x
6
Cache Detected - Elapsed Time: 485ms
See Internal
Server
Error](https://teech-lab.com/wp-content/uploads/2021/03/image-23-1024x410.png)
app.js
var createError = require('http-errors');
var express = require('express');
var path = require('path');
var cookieParser = require('cookie-parser');
var logger = require('morgan');

var indexRouter = require('./routes/index');
var usersRouter = require('./routes/users');
var memoRouter = require('./routes/memo'); // add

var app = express();

// view engine setup
app.set('views', path.join(__dirname, 'views'));
app.set('view engine', 'jade');
app.use(logger('dev'));
app.use(express.json()); // jsonオブジェクトとして認識する
app.use(express.urlencoded({ extended: true })); // application/x-www-form-urlencodedを識別できるようにする。(trueにすることで階層構造(a[b]=c)を認識する)
app.use(cookieParser());
app.use(express.static(path.join(__dirname, 'public')));

app.use('/', indexRouter);
app.use('/users', usersRouter);
app.use('/memo', memoRouter); // add

// catch 404 and forward to error handler
app.use(function(req, res, next) {
  next(createError(404));
});

// error handler
app.use(function(err, req, res, next) {
  // set locals, only providing error in development
  res.locals.message = err.message;
  res.locals.error = req.app.get('env') === 'development' ? err : {};
  // render the error page
  res.status(err.status || 500);
  res.render('error');
});

module.exports = app;
ここまでできたら、確認してみましょう!!
メソッドを「POST」にして、「http://localhost:3000/memo」にSendしてみましょう!
![METHOD
POST
HEADERS -
Content-Type
+ Add header
Response
2ØØ OK
HEADERS
X-Powered -By :
Content- Type :
Content- L ength :
ETag:
Date :
Connec tion :
SCHEME HOST [ PORT [ PATH [ QUERY
http://localhost:3000/memo
QUERY PARAMETERS
+ Add query parameter
application/json
Add authorization
Express
application/json; charset=utf-8
22 bytes
-Is
Tue, 16 Mar 2€21 GMT
keep -alive
length: 26 byte(s)
Form
pretty
BODY
memo
id
Text JSON XML HTML I
Format body
4 Send
Text
length: 51 bytes
BODY
id :
1,
text :
lines nums
Enable body evaluation
O Bottom
Cache Detected - Elapsed Time: 37ms
"text"
o Top
Open
2Request
Q] Copy
pretty
Download](https://teech-lab.com/wp-content/uploads/2021/03/image-18-1024x610.png)
リクエスト時にBodyに指定した値が、そのままレスポンスのBodyに入っていればOKです!
レスポンス側のBodyでは、区別のためmemo{}は抜いてますので、ミスではありません。
まとめ
今回は、JSON形式でリクエスト・レスポンスできるWebAPIを作成していきました。
単純なAPIでしたが、次回以降はDBとの連携を考慮したRestAPIなどを作成していこうと思います!
昨今においてAPIは、すごく使われている言葉なのでぜひ覚えておいてください!
学習に使った本はこちら!
クマじいAmazon Kindle Unlimited でもNode.jsの本はいっぱいあるんじゃ!!
NodeとExpressのアプリで、データベースを扱う方法をこちらで紹介しているのでぜひ参考にしてみてください!