今回は、GCP(Google Cloud Platform)のサービスであるGCE(Google Compute Engine)のインスタンスを立ち上げて、Apacheを導入していこうと思います!
GCPは、AWSと違ってAllways Freeという無料枠があるので、お金がかかるのが不安という方も安心して試してみることができると思います!!
![](https://teech-lab.com/wp-content/uploads/2021/01/odoroki-cutout.png)
Amazon Kindle Unlimited でもGCPの本はいっぱいあるぞ!
AWSの説明の記事ですが、クラウドとは?みたいな内容を説明しております。
GCEのようなIaaSとはみたいな内容の説明しておりますので、IaaSを使うのは初めてというかたは、こちらの記事を先に読むことをお勧めします!
![](https://teech-lab.com/wp-content/uploads/2021/01/17ebbccd82968df78509a6d475819141-300x169.png)
- GCPを初めて触る!
- GCEを触ってみたい!
- GCEでApache環境を構築したい!
まずは、会員登録しよう!
無料で使う場合でも会員登録が必要です。
こちらから登録可能です!!
![](https://cloud.google.com/_static/cloud/images/social-icon-google-cloud-1200-630.png)
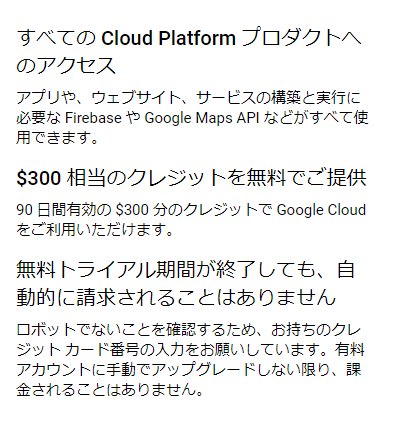
先ほども説明しましたが、Allways Freeがあり無料で使うことも可能ですし、登録する上で下記のようなメッセージが表示されると思います。
こちらを確認すると、無料トライアル期間が終了しても自動で請求されることはないそうです。
![す . 弋 て の Cloud Platform プ ロ タ ク ト へ
の ア ク セ ス
ア プ リ や 、 ワ エ プ サ イ ト 、 サ ー ヒ ス の 橋 第 と 実 行 に
必 要 な 日 ba “ や G009 に M 叩 5 API な ど か す べ て 使
第 で き ま す を
S300 相 当 の ク レ ジ ッ ト を 無 料 で ご 提 供
90 日 間 有 効 の S300 分 の ク レ ジ ッ ト で Go 内 に Cloud
を こ 利 用 い た た け ま す
無 料 ト ラ イ ア ル 期 間 が 終 了 し て も 、 自
動 的 に 詰 求 さ れ る こ と は あ り ま せ ん
ロ ボ ッ ト で な い こ と を 確 認 す る た め 、 お 持 ち の ク レ
ジ ッ ト カ ー ド 番 号 の 入 力 を お 願 い し て い ま す る 有 料
ア カ ウ ン ト に 手 動 で ア ッ プ グ レ ー ド し な い 限 り 、 課
金 さ れ る こ と は あ り ま せ ん](https://teech-lab.com/wp-content/uploads/2021/04/image-19.png)
GCEのインスタンスを立ち上げよう!
そもそもGCEとは何かというと、Googleが提供するIaaS(Infrastructure as a Service)でハードウェアのリソース(CPUやメモリ、ストレージなど)のインフラをインターネット経由で利用できるサービスです。
似たサービスだと、AWSのEC2が有名だと思います!!
今回は、そんなGCEを使ってみようという内容になっています!
プロジェクトを作成しよう!
では、早速始めていきましょう。
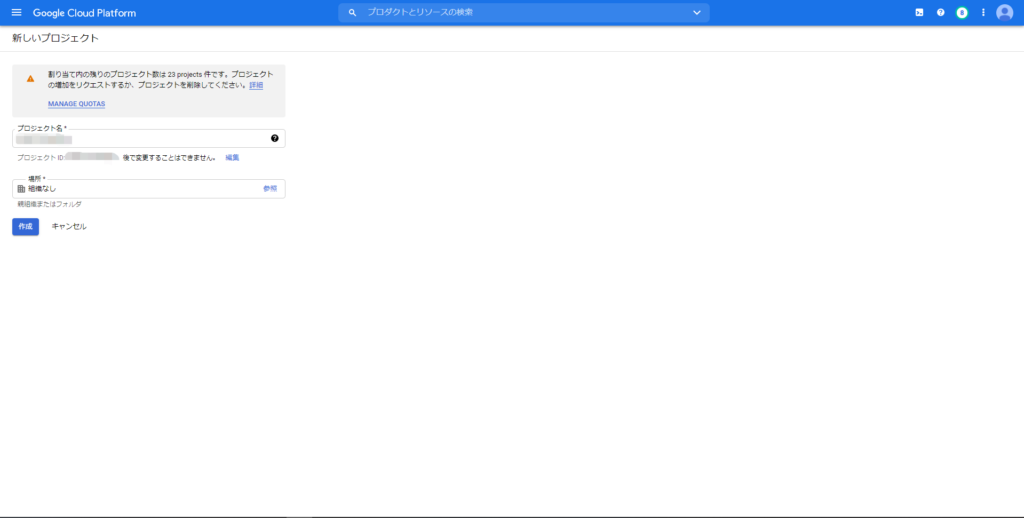
まず、GCPを利用していくにあたりプロジェクトを作成する必要があります!
任意のプロジェクト名を登録し、作成ボタンを押してください!
![](https://teech-lab.com/wp-content/uploads/2021/04/image-21-1024x518.png)
プロジェクトが作成できたら、下のような画面が表示されると思います。
![](https://teech-lab.com/wp-content/uploads/2021/04/image-24-1024x518.png)
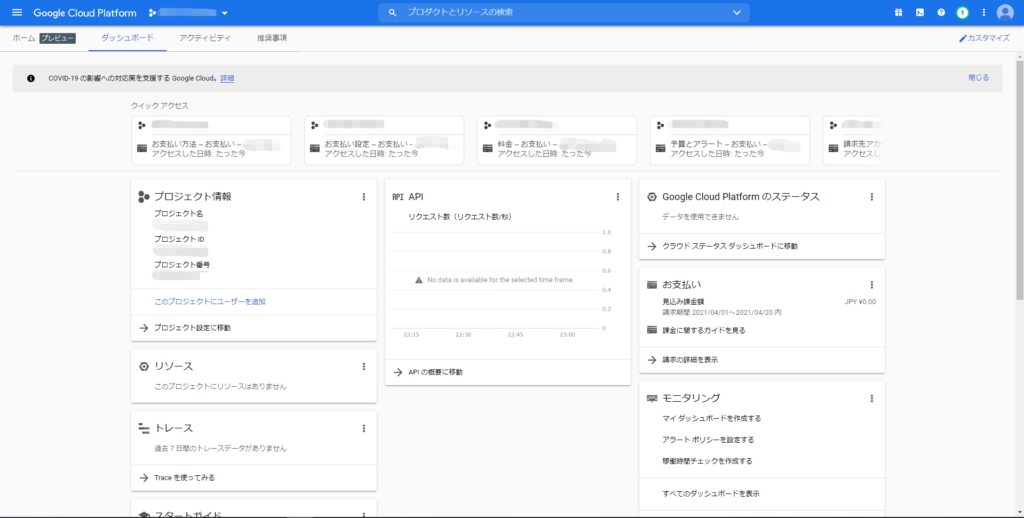
この画面は、支払い金額やリソースを確認するためによく使う画面なので覚えておくといいと思います。
GCEのインスタンスを立ち上げる
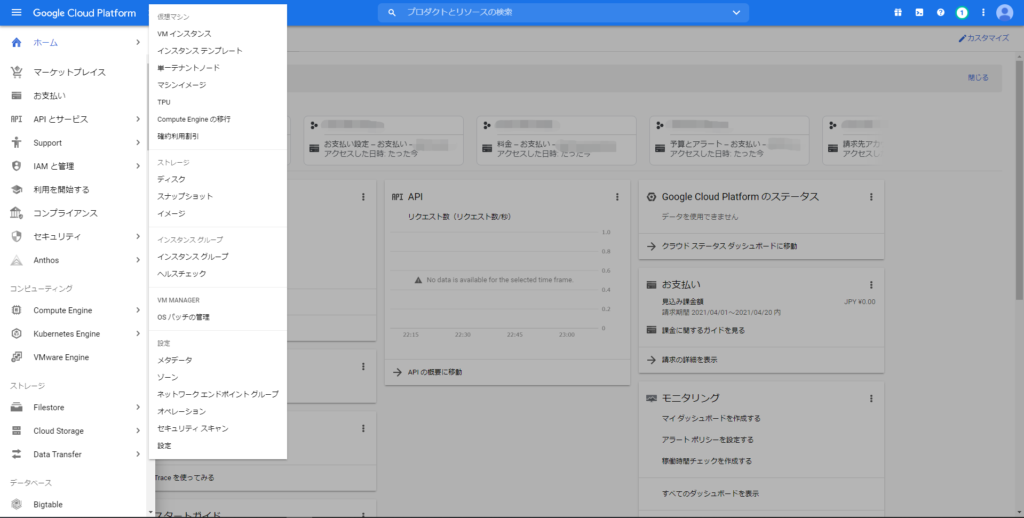
ここまでできたら、GCEのインスタンスを立ち上げましょう!
メニュー>Compute Engine>VMインスタンスを選択してください!
![](https://teech-lab.com/wp-content/uploads/2021/04/image-23-1024x518.png)
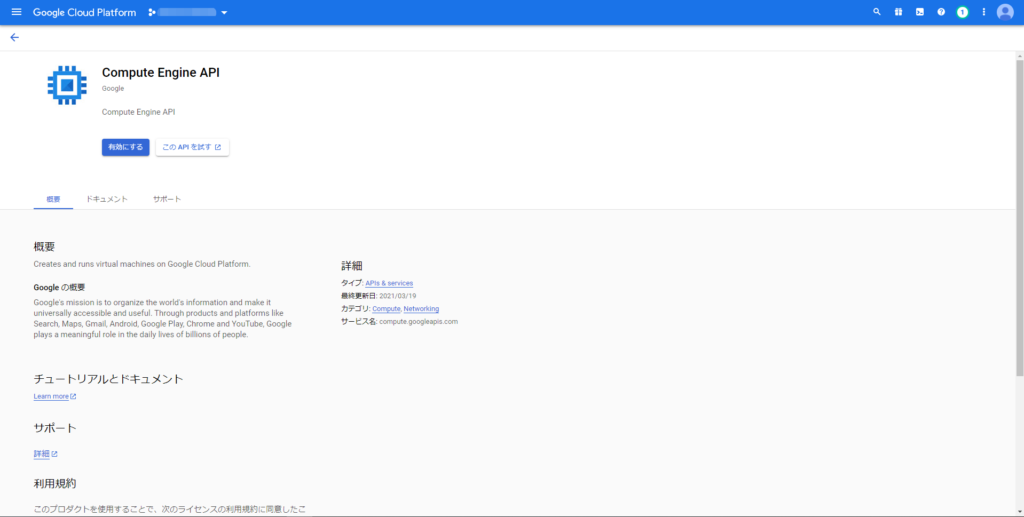
Compute Engine APIの画面が出てくると思いますが、こちらは「有効にする」を選択します。
有効にすると、ライセンスの利用規約に同意したことになりますのでライセンスの利用規約はしっかり読んでください!
![](https://teech-lab.com/wp-content/uploads/2021/04/image-25-1024x517.png)
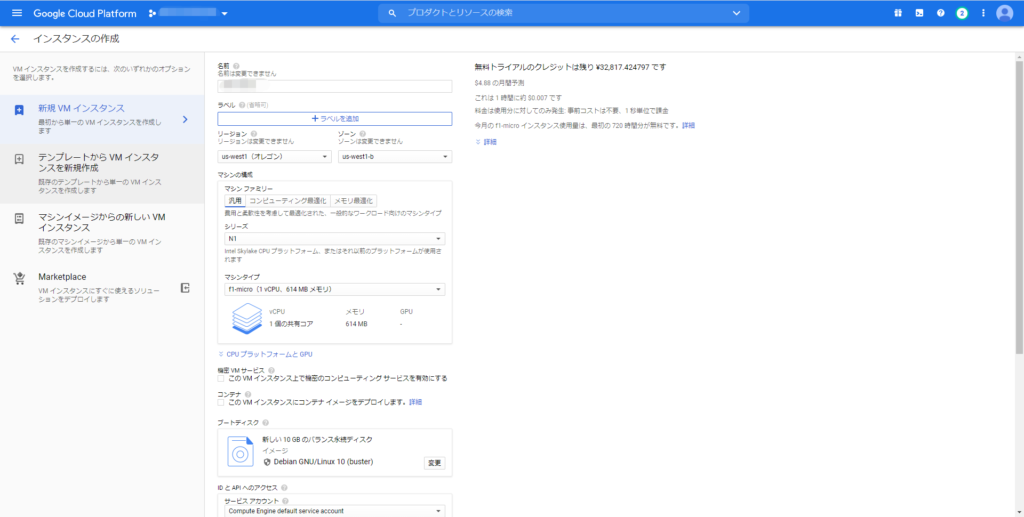
VMインスタンスの画面が開けたら、「インスタンスを作成」を選択しましょう!!
![](https://teech-lab.com/wp-content/uploads/2021/04/image-26-1024x518.png)
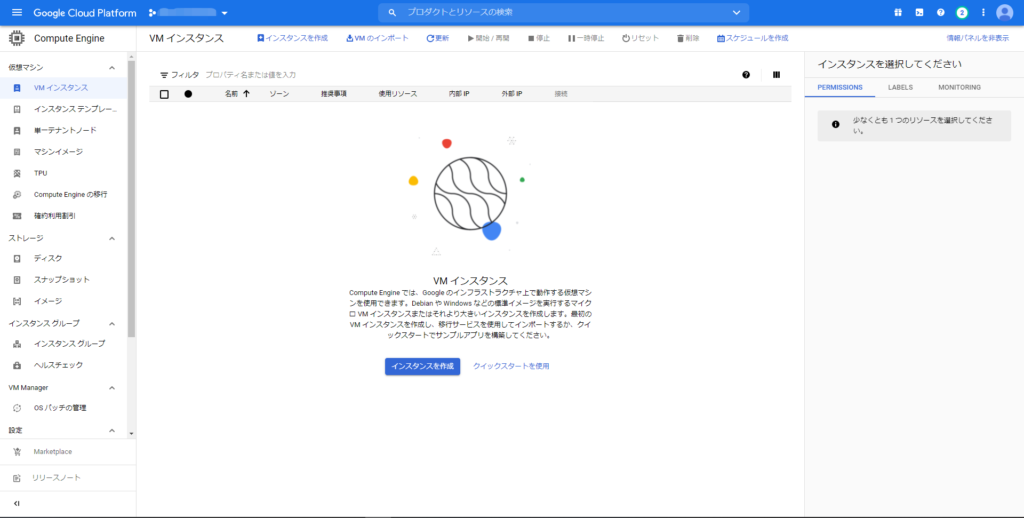
インスタンスの作成画面では、リージョンやマシンのスペックを選択することができます。
リージョンとは、データセンターを設置しているエリアのことです。簡単にいうと、マシンが置いてある場所だと思えばいいと思います。
無料枠を使うにあたり、今回はオレゴン(us-west1)に設定し、マシンのスペックはf1-microに設定します。
マシンのスペックは、CPU単位でカスタマイズすることもできますし、テンプレートで設定することもできます。
他の設定は、今回は特に触りませんので「作成」ボタンを押してください!
![](https://teech-lab.com/wp-content/uploads/2021/04/image-27-1024x517.png)
インスタンスが作成できると先ほどのVMインスタンス画面に作成したインスタンスが表示されていると思います!
![](https://teech-lab.com/wp-content/uploads/2021/04/image-28-1024x518.png)
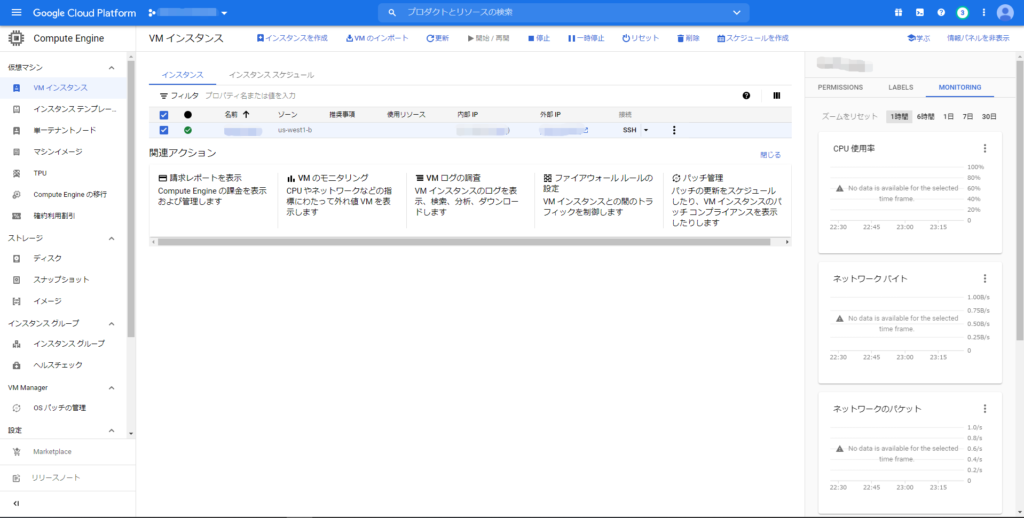
これでインスタンスの立ち上げは完了です!
Apacheを導入しよう!
続いては、Apacheを導入していこうと思います!
先ほど作成したインスタンスの「SSH」か「SSH横の▼>ブラウザウィンドウを開く」を選択してください!
![](https://teech-lab.com/wp-content/uploads/2021/04/image-29-1024x517.png)
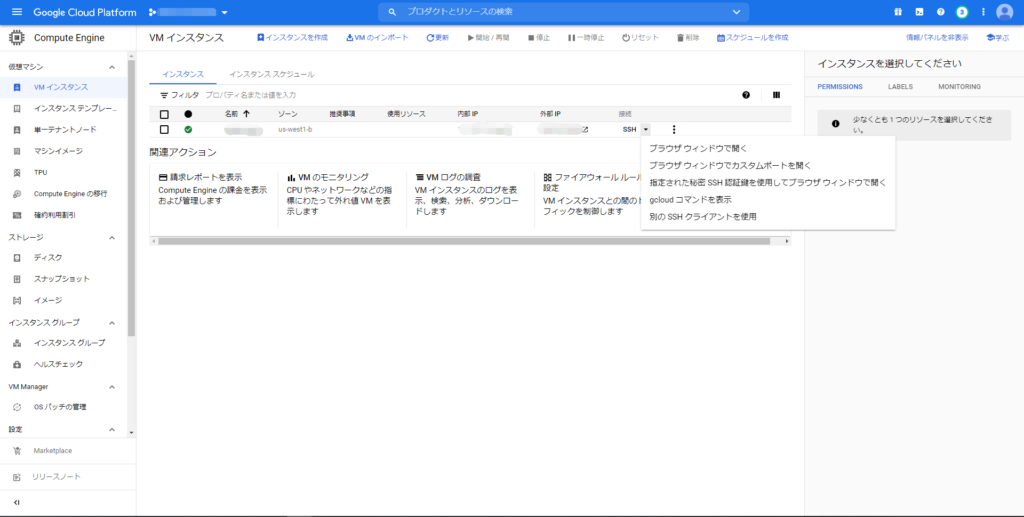
すると、ブラウザでコンソール画面が表示されると思います。
![](https://teech-lab.com/wp-content/uploads/2021/04/image-30-1024x523.png)
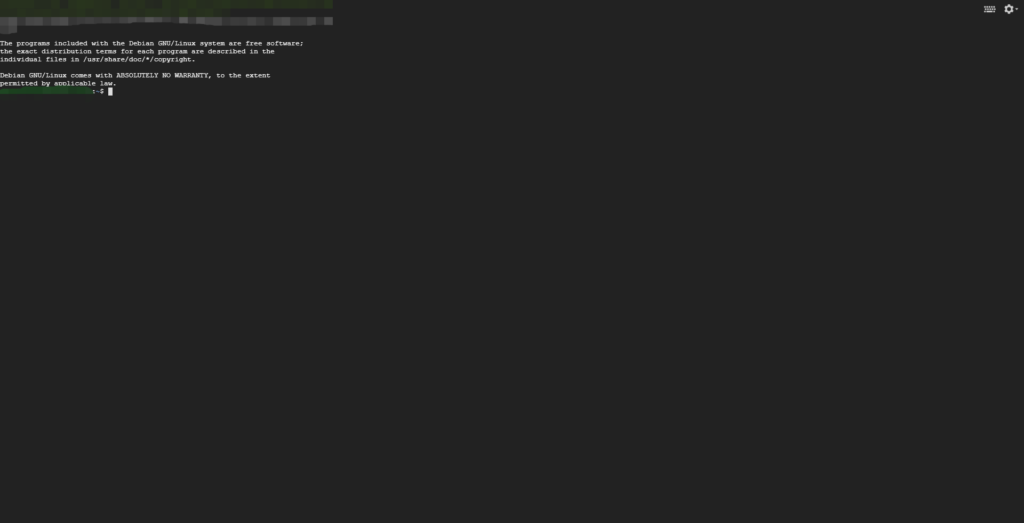
ここで、コマンドを入力してApacheをインストールしていきます!
apt-getでパッケージリストを更新しよう!
apt-getとは、パッケージの操作・管理を行うコマンドです。
CentOSとかだとyumコマンドを利用しますね!
Apacheをインストールする前に、apt-get updateを実行して、アップデート可能なパッケージがあるかチェックして、パッケージリストを更新しておきましょう!
下記のコマンドを実行するだけです!
*****@*****:~$ sudo apt-get update
Apacheをインストールしよう!
Apacehをapt-getを使ってインストールしましょう!
下記のコマンドを実行してください!
*****@*****:~$ sudo apt-get -y install apache2
Apacheを起動する!!
インストールできたら、実際に起動していきましょう!
起動のコマンドは、下記です。
*****@*****:~$ sudo systemctl start apache2
起動できたか確認するために、プロセスを確認してみましょう!
*****@*****:~$ ps -aux | grep apache
root 8102 0.0 3.3 196800 19716 ? Ss 14:35 0:00 /usr/sbin/apache2 -k start
www-data 8104 0.0 1.3 196824 8220 ? S 14:35 0:00 /usr/sbin/apache2 -k start
www-data 8105 0.0 1.3 196824 8220 ? S 14:35 0:00 /usr/sbin/apache2 -k start
www-data 8106 0.0 1.3 196824 8220 ? S 14:35 0:00 /usr/sbin/apache2 -k start
www-data 8107 0.0 1.3 196824 8220 ? S 14:35 0:00 /usr/sbin/apache2 -k start
www-data 8108 0.0 1.3 196824 8220 ? S 14:35 0:00 /usr/sbin/apache2 -k start
*****+ 8215 0.0 0.1 4836 892 pts/0 S+ 14:38 0:00 grep apache
このようになっていれば、起動できていると思います!
Apacheを確認してみよう!
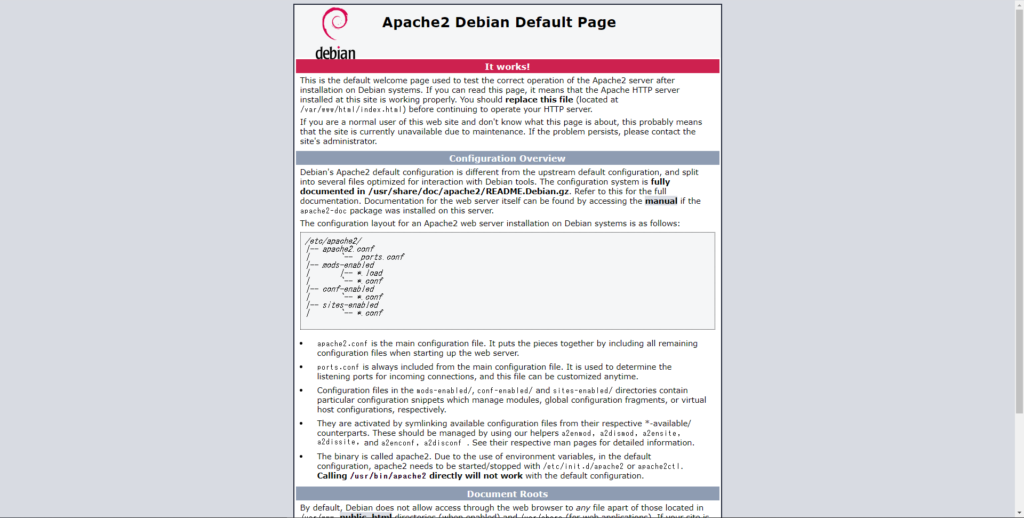
では、実際に外部IPからApacheが起動できたか確認してみましょう!
VMインスタンス画面で、先ほどApacheを導入したインスタンスの外部IPを選択してください!
![](https://teech-lab.com/wp-content/uploads/2021/04/image-32-1024x518.png)
下記のようにApache画面が表示されたら成功です!!
![Apache2 Debian Default Page
It works!
This is the default welcome page used to test the correct operation of the Apache2 server after
installation on Debian systems. If you can read this page, it means that the Apache HITP server
installed at this site is working properly. You should replace this file (located at
/var/wwv/html / index ht I) before continuing to operate your HITP server.
If you are a normal user of this web site and don't know what this page is about, this probably means
that the site is currently unavailable due to maintenance. If the problem persists, please contact the
site's administrator.
Configuration Overview
Debian's Apache2 default configuration is different from the upstream default configuration, and split
into several files optimized for interaction with Debian tools. The configuration system is fully
documented in / usr/share/doc/apache2/README.Debian.gz. Refer to this for the full
documentation. Documentation for the web server itself can be found by accessing the manual if the
apachg2-doc package was installed on this server.
The configuration layout for an Apache2 web server installation on Debian systems is as follows:
/8tc/apachg2/
- apaaftg2. aonf
ports. conf
mods lad
/,— load
aanf
conf-enab I gd
aanf
s i tgs—gnab / gd
— conf
apache2. conf is the main configuration file. It puts the pieces together by including all rernaining
configuration files when starting up the web server.
ports. conf is always included from the main configuration file. It is used to determine the
listening ports for incoming connections, and this file can be customized anytime.
Configuration files in the nods-enab led/, conf-enab led/ and sites-enab led/ directories contain
particular configuration snippets which manage modules, global configuration fragments, or Virtual
host configurations, respectively.
They are activated by symlinking available configuration files from their respective *-available/
counterparts. These should be managed by using our helpers a2ennod, a2disnod, a2ensite,
a2dissite, and a2enconf , a2disconf . See their respective man pages for detailed information.
The binary is called apache2. Due to the use of environment variables, in the default
configuration, apache2 needs to be started/stopped with c/ init . or apache2ct I .
Calling /usr/bi n/apache2 directly will not work with the default configuration.
Document Roots
dy default, Debian does not allow access through the web browser to any file apart of those located in](https://teech-lab.com/wp-content/uploads/2021/04/image-33-1024x518.png)
【おまけ】PHPを導入してみよう!
せっかくなので、おまけとしてPHPでも導入してみようと思います!
PHPをインストールする!
apt-getを使ってPHPをインストールしましょう!
コマンドは、Apacheをインストールした時と同じような感じです。
*****@*****:~$ sudo apt-get -y install php
インストールできたかは、PHPのバージョンを確認するコマンドで確認します。
*****@*****:~$ php -v
PHP 7.3.27-1~deb10u1 (cli) (built: Feb 13 2021 16:31:40) ( NTS )
Copyright (c) 1997-2018 The PHP Group
Zend Engine v3.3.27, Copyright (c) 1998-2018 Zend Technologies
with Zend OPcache v7.3.27-1~deb10u1, Copyright (c) 1999-2018, by Zend Technologies
こんな感じで、PHPのバージョンが表示されていればOKです!
index.htmlを修正する!
先ほどApacheの画面が表示されていたファイルを変更します。
「/var/www/html/index.html」が先ほど表示されていたファイルです。
まず、index.htmlをindex.phpに変更しておきましょう!
ymph6cb5jk@teech-study:~$ sudo mv /var/www/html/index.html /var/www/html/index.php
続いて、中身をvimコマンドで編集します。
*****@*****:~$ sudo vim /var/www/html/index.php
vimの使い方は、今回は紹介しませんが「:%d」で全行削除できます。
全行消したら下記の内容に書き換えてください。(コピペする場合は、そのままでいいですが手入力する場合は、「i」を入力してInsertモードに切り替えてください!)
書き換えたら「:wq」で上書き保存をします!
<html>
<head>
</head>
<body>
<div>
<?php
echo "Hello World!!"
?>
</div>
</body>
</html>
画面を確認する!
書き換えができたら画面を確認してみましょう!!
先ほど書き換えた内容になっているはずです!
![elb World! !](https://teech-lab.com/wp-content/uploads/2021/04/image-34-1024x518.png)
まとめ
今回は、GCEのインスタンスの立ち上げとApacheのインストール、おまけにPHPのインストールを解説していきました。
もし、今後使う予定がないのであれば念のためインスタンスを停止しておくことをお勧めします。
(インスタンスを停止しておけば、課金も発生致しません。)
![](https://teech-lab.com/wp-content/uploads/2021/01/odoroki-cutout.png)
Amazon Kindle Unlimited でもGCPの本はいっぱいあるぞ!
AWSのEC2も無料枠はありますが、課金されてしまう可能性があり手が出せていない。。。という方は、ぜひGCPのGCEの無料枠を使って試してみてはいかがでしょうか!!